
processhead It sure helps me… a beginner!
 R
R
Retired157
@Retired157
Posts
-
Smoker Upgrade! -
Smoker Upgrade!@dennyo The light is (just) a visual confirmation that everything is working. So, when the PID decides that ‘power’ is needed and turns on that power to the heating element of the smoker, the light bulb comes on. Is this really needed… maybe not. I will tell you that after doing this upgrade to my smoker and making my first batch of SS, I found being able to (see) all the parts & pieces as they were working was actually very interesting. Not only could I see how long the PID was directing power to the heating element, I could see ‘how long’ the power was being applied. Would I wire my smoker upgrade this way if I were to do it again… YEP! I really like that visual (understanding) confirmation.
Hope that helps. Just so you know, you do have to separate the two ‘sockets’ of the outlet itself to make this work. My upper socket of the outlet is wired with the PID so as to ONLY have a power supply when the PID itself directs power to the heating element. My lower socket of the outlet is simply ‘powered on’ (constant) when I plug my smoker in.
-
Sous Vide suggestions and questions- 25lb BatchesWell son of a gun… Grimpuppy came up with the same solution as I did! Here I thought I was being ‘original’. lol I actually took four racks (just like what GP has shown there) and using some stainless steel threaded rod (washers & nuts), built a ‘3-tier’ holding rack. It’s basically ‘fit to size’ and my SS will no longer be able to escape and roam around. Each level will/can hold three SS’s but given the limits of my smoker, I can only make six SS’s per run/time. So, I can easily get two SS’s per level… allowing for LOTS room between/around each SS for water circulation. I know, I know… overkill!
The 10"x15" cooling racks fit perfectly in my SV cooler-cooker… no modifications required. Can’t wait to give it a go!
-
Sous Vide suggestions and questions- 25lb BatchesGlad to see I’m not the only one, lol. I guess what I found out to be the most difficult part of doing the SV process with my SS was not so much the ‘should I or should I not’ cover it before putting it in the water, but the ‘HOW’ do you get those suckers submerged in the water AND under control during the SV cooking process… that truly was like herding cats! I THOUGHT I had designed a way to get it done but quickly realized that my SS was having no part of it… those suckers had a mind of their own! So, I had to make some ‘on the fly’ adjustments and I did manage through. Since then, I have come up with another (simple) solution; one that I think will absolutely get the trick done. When I do my second batch of SS here in the not to distant future, I will take some pics to show everyone what I designed… think’n I have this ‘cat’ issued figured out!
-
Sous Vide suggestions and questions- 25lb BatchesCall me ‘cheap’ if you want to, but I didn’t want to waste any of my vacuum bags… so, I just wrapped my SS with Saran Wrap before placing them in the SV cooker. The Saran Wrap worked perfectly in keeping my SS ‘dry’.
-
Ukrainian VodkaBeing retired law enforcement myself, I totally understand your POST. Your POST caused me to go downstairs into my ‘Cave’ and take a look at the display I made for all the Challenge Coins I collected over the years. For I long time I just held these ‘memories’ in a dresser drawer but always seemed to be getting in to them…
I decided a few years back that I wanted them out where I could SEE them and share them with friends, so I (again) designed my own Display… it was a little bit of ‘fine’ work, but I like how it turned out. I have it hanging from the ceiling now. My boys I hope fight over it when I’m gone…

So, if you haven’t already, do yourself a huge favor and pull all those coins & trinkets out and display them proudly… the memories are worth the effort.


-
Smoking Temps/Times - USDA@bmartin1000
Hey, I looked that thing up; pretty slick. If there’s one thing I am learning from this forum it’s this… there’s no end to all the ‘toys’ we ‘smokers’ can collect! It’s like walking into the back of that Snap-On tool truck for the first time and realizing… Dang, I’m going to need a bigger tool box!
-
Smoking Temps/Times - USDAHey everyone,
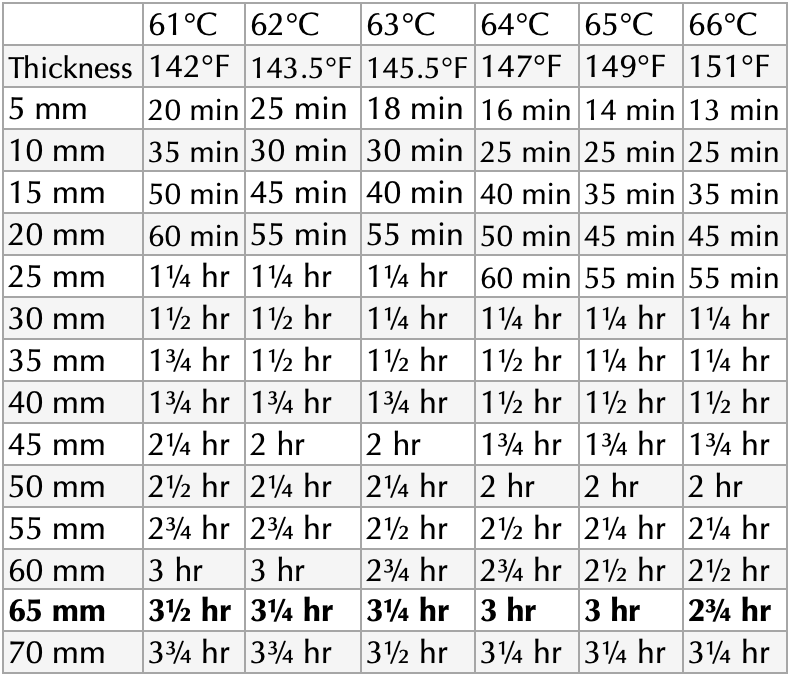
I found these USDA ‘Charts/Tables’ as I was doing some research with respect as to how long to Sous Vide ‘cook’ my Summer Sausage after ‘smoking’… just thought maybe someone else out there may find some useful information in these as well. You’ll notice that I ‘bolded’ the ‘65mm’ section… 65mm was just perfect for the 2-1/2" fibrous casings I use.
Later
Pasteurization Time for Meat (Beef, Pork, and Lamb)
(starting at 41°F / 5°C and put in a 131–151°F / 55–66°C water bath)
Table 5.1: Time required to reduce Listeria by at least a million to one, Salmonella by at least three million to one, and E. coli by at least a hundred thousand to one in thawed meat.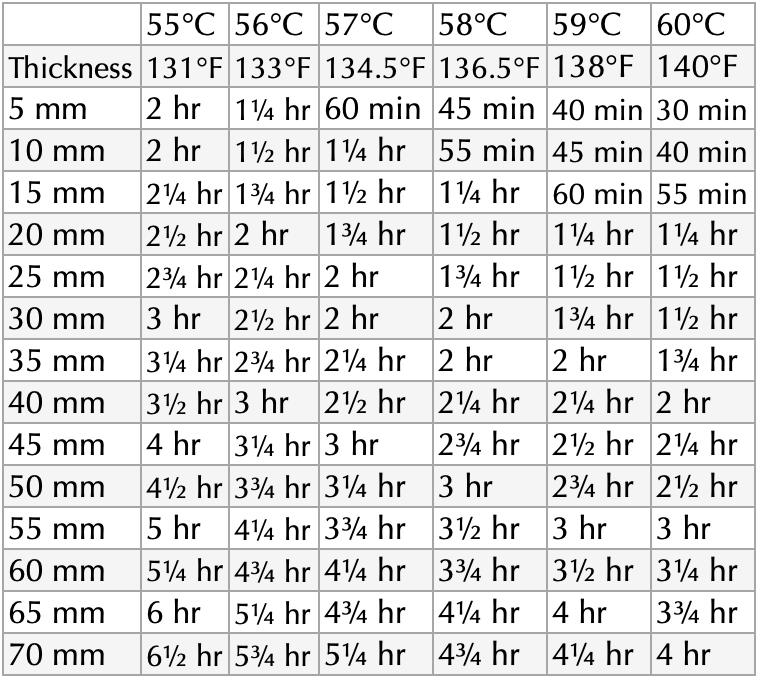

-
Helpful forum/post updatesHey guys… I for was having one heck of a time with suppling pics to my POSTS for quite a while. Then, ‘someone’, and I forget just who it was, identified ‘the problem’… it was my iPhone and the way ‘Apple’ chooses to ‘optimize’ the pics. He directed me to the solution…
Go into your ‘Settings’…
Go to ‘Camera’…
Go to ‘Format’…
Then change from Apple’s ‘High Efficiency’ setting to the ‘Most Compatible’ settingAfter making this very simple change, I have had absolutely NO issues at all in up loading any ‘new’ pics I take with my phone and placing them in a POST.
I will tell you that I upload pics one at a time JUST so as not to overwhelm whatever these ‘server brains’ (something I have no knowledge about nor do I want to even understand) can handle.
I hope this might help you and anyone else out there using iPhones…
Thank You again to whoever it was that ‘figured’ out this solution!
Keep Up the good work…
-
Sous Vide suggestions and questions- 25lb BatchesPerfect!
-
Smoker Upgrade!Thanks… sometimes I do get lucky.
-
Smoker Upgrade!I might have to see if I can’t ‘incorporate’ that in my garage. I actually did a lot of my clean up in the bath tub. My wife was not at home… she didn’t ‘ask’ so I’m guessing I did ok.
-
Smoker Upgrade!Now that air vent stack in the door… totally an ESSENTIAL item!!!
-
Smoker Upgrade!Yep! I can’t imagine trying to maintain a constant temperature without the help of a PID. Is it something that you can set and walk away from for hours… no; but I was doing dishes, taking the dog out, drinking a beer or two and ‘watching’… not once did I lose control.
I will tell you that I surprised to see that the ‘dial’ temp gauge I installed in the door was pretty much useless… it was not ‘accurate’ at all when comparing to the PID readings. If I had to do it over, I’d not even put one in. The PID with the temp probe I installed is ALL you need.
-
Smoker Upgrade!Yep, I just positioned one of my bedroom fans about two feet from my ‘stack’ there on the door. Then, as the PID brings my smoker up to temp, I ‘tinker’ with the stack’s open/close lid and the fan’s airspeed until they all begin to work together to/and maintains the temp I want. It takes very little (maybe 5minutes) to get it right and I keep an eye on it to ‘catch’ any fluctuations which might occur. I can tell you that I pretty much can keep my temp within a plus or minus 3 degrees of my desired temp. So, if my cooking schedule calls for 1 hour @125F, I do not start my timer until I have my ‘temp’ at 125…
That fan is a ‘Vernado’… has three speeds and it works just perfect for what I do/needed. Very easy… I’m all about easy!
No fan ‘inside’ the smoker…
I was doing the smoking in my garage, so when I added the 2oz’s of wood, as it was ‘smoking’ out the top vent hole on my smoker, I took the Vernado out of the spare bedroom and positioned it on a step-stool (higher) to direct the smoke out of the garage. Kinda figured that out as I was doing it. Once the wood was ‘done’ and there was no more smoke being generated, I stopped using the second fan and could close the garage door again. It was only about 30 degrees outside when I did this so I didn’t want to spend the WHOLE day outside… the garage was a perfect option.
Hope that explanation helps
Bottomline… I did not find maintaining my desired temperature(s) any problem at all. That PID thing (in spite of me) knew just what to do!
-
Smoker Upgrade!… I couldn’t have been MORE pleased with how my smoker upgrade(s) worked. That’s what I was trying to ‘write’
-
Smoker Upgrade!I can’t have been pleased with ‘how’ my smoker upgrade(s) worked! I would strongly encourage anyone thinking about doing something like I did to just… ‘Do It’. I worked through a few issues and learned a lot… I think. I don’t know exactly how this site works but I did include my phone number within my ‘profile’. If you ever want to ‘pick my brain’ for any crumbs that might help you with your upgrade, just call. I promise you this; I too was very ‘intimidated’ with doing this but after diving into it, I found out that ‘with a little help’, it was way easier than I was imagining.
-
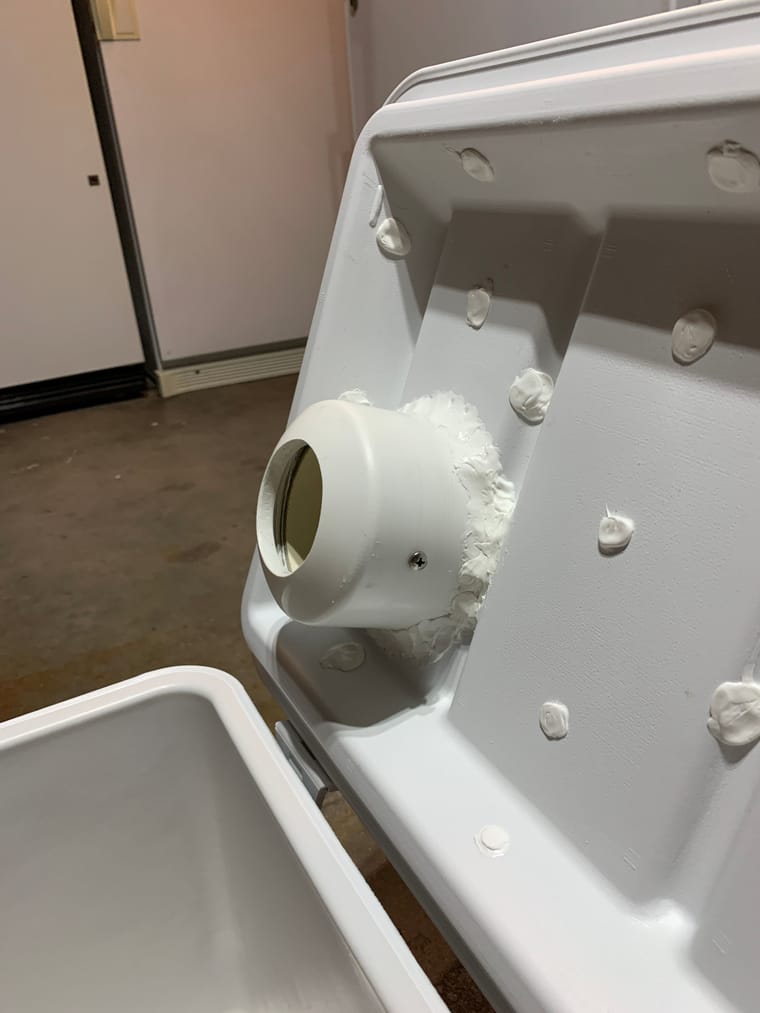
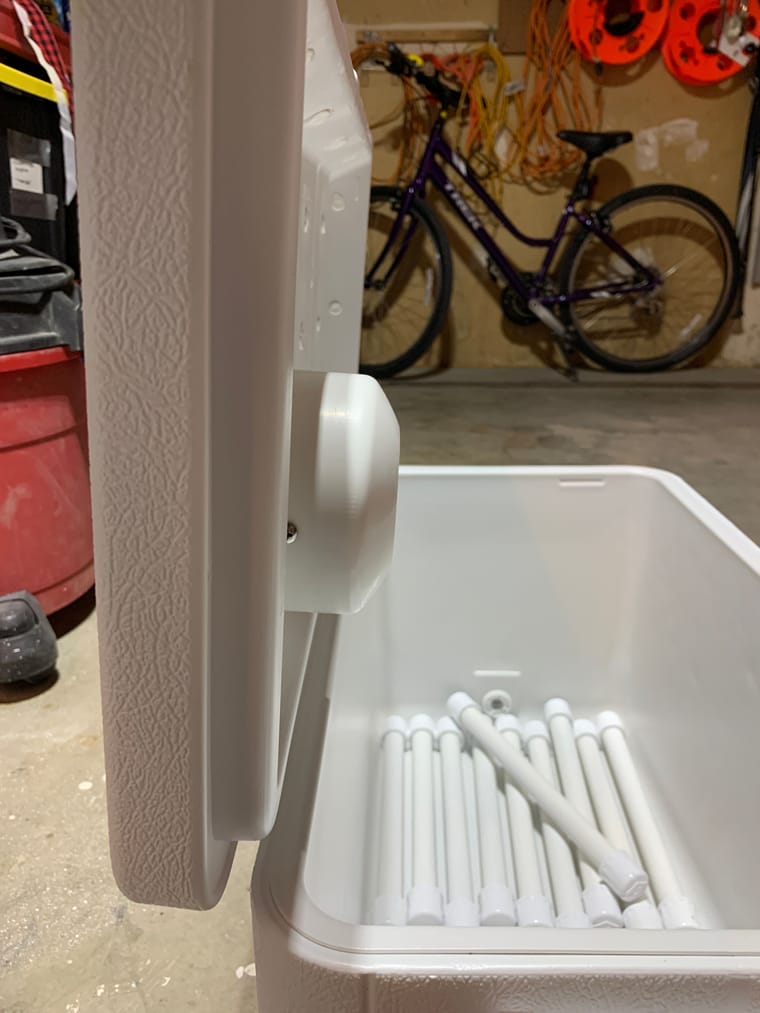
Sous Vide suggestions and questions- 25lb BatchesHere’s how I designed my ‘solution’ to that problem of having the Anova held ‘to high’ from the water… using 3" PVC. Now my Anova actually goes ‘through’ the lid and sits well ‘inside’ the cooler. It sits about 3" ‘deeper’ doing it this way… and with a full cooler, my water level is nearly at the ‘MAX’ line. In fact, if I were to make that ‘slot’ you see there in the first pic (it’s to allow for the power chord) even deeper (to the bottom of the lid), I could submerge the Anova another 1" into the water but from what I can tell, this design gives me all the depth I need. I simply (after placing my SS in) level the water till it’s coming through that hole you see as cut in the bottom of that 3" cap. At that point, the Anova is basically submerged to its ‘MAX’ line. Hope that makes sense…
 /Users/Ron/Pictures/Ron’s Photos Library.photoslibrary/originals/D/D131D5B1-6CD0-404B-AD86-4DBB9D4AAF33.jpeg
 /Users/Ron/Pictures/Ron’s Photos Library.photoslibrary/originals/9/91DB2BCD-AA88-4CEF-8321-F57C6A5C710E.jpeg
 /Users/Ron/Pictures/Ron’s Photos Library.photoslibrary/originals/9/90F19B01-D197-4F65-B32D-F27B7DDD7142.jpeg
 /Users/Ron/Pictures/Ron’s Photos Library.photoslibrary/originals/0/00CE50AD-4D73-4AC0-99A0-1DE658067B83.jpeg
 -
Sous Vide suggestions and questions- 25lb BatchesDon’t know if this helps you, but here is what I did…
-
Sous Vide suggestions and questions- 25lb BatchesFor me, I do 10 pounds at a time… I’m a small operator
so my 48 quart Colman Cooler works perfectly and I the ‘design’ I came up with allows me to set my Anova ‘through’ a hole in the lid and plenty ‘deep’.Here’s the one think that really stuck with me when I was doing my research… DO NOT ever pull your SV from the water WITHOUT first turning it off. Apparently the circulating pumps of SV will almost immediately fail without water to work/circulate. So, however or whatever you design, just be sure to keep the water well above the ‘MIN’ line and be sure to turn OFF your SV when checking/probing for internal temperatures
