How To Make Homemade Snack Sticks

-
mesbilawson That’s awesome, hope your next batch is as good as the first!
-
Are the snack sticks made as described “shelf stable”, or do they have to be refrigerated or frozen?
jcflorida they need to be refrigerated unless you have a way to measure water activity and the pH of your meat. They might be “shelf stable” but without a way to test them it is not worth the danger of spoilage
-
I have really been struggling with making snack sticks, with several failed attempts to the point I’m almost ready to give up.
My issue isn’t flavor, its look and texture. I cannot get that tight, lightly wrinkled look of a snack stick. My meat just doesn’t seem to bind to the casing like it should. The casing always ends up kind of loose, and when you bite into it or try and break a piece in half, the casing and meat separate which is pretty unappetizing.
I am using wild game meat, and I have been experimenting with fat ratios, some batches I know I have done too lean.
I haven’t been adding the protein binder, or citric acid (I am not sure why, not reading the recipe correct I guess) but this next batch I plan to use it and see if that helps, if I fail again though I’m ready to throw in the towel, its getting frustrating so I’d love some help and input. Snack sticks are a great way to eat up ground wild game but it sure is kicking my butt so far.
I had similar complaints trying to get my summer sausage correct. It was “de-fatting” with loose casing, dry, and a terrible texture, although the product tasted pretty good. Jonathan and Austin walked me through the process, but for me the key issue was mixing the meat long enough to get good protein extraction. I bought one of the Walton’s 20 lb. mixers and it works great–easy to turn and reverse; does a great job and was surprisingly well built at the price. It made a huge difference in my summer sausage–came out looking as good as it tastes, moist, and with a great mouth feel.
Try mixing for 8-9 minutes with a meat mixer or twice as long if mixing by hand. When you get the right mix, it emulsifies the water and fat to the meat protein so that the final product stays plump and moist. Smoke your product for 3-4 hours and finish in a water bath poaching to bring it up to 160F internal temp. Chill in an ice water bath when done.
Good Luck
Greg -
I am getting ready to make a batch of snack sticks and I noticed that you recommend using pork fat with venison. I have always used beef fat in the past and was wondering why you recommend using pork fat. Also, do you soak your collagen casings in water prior to stuffing? Or do you use them just as they are? Thanks
-
hharris We recommend pork fat because it has a creaminess to it that other animals fats really don’t match. For example I can cleary tell the difference in texture and taste when I am making pork brats or snack sticks vs when I have used beef. Part of the taste difference is in how the fat coats your mouth it allows it to linger longer. Also, when you are making a product that you would want particle definition on (salami, pepperoni and some bolonga) the back fat from a hog is nice and firm and displays really nicely. Now, some people object to pork for either health or religious reasons so adding beef fat can and very often is substituted!
Don’t rinse, or soak your collagen just take it right out of the package, load it onto your stuffing horn and you are good to go!
Let us know if you have any other questions!
-
hharris We recommend pork fat because it has a creaminess to it that other animals fats really don’t match. For example I can cleary tell the difference in texture and taste when I am making pork brats or snack sticks vs when I have used beef. Part of the taste difference is in how the fat coats your mouth it allows it to linger longer. Also, when you are making a product that you would want particle definition on (salami, pepperoni and some bolonga) the back fat from a hog is nice and firm and displays really nicely. Now, some people object to pork for either health or religious reasons so adding beef fat can and very often is substituted!
Don’t rinse, or soak your collagen just take it right out of the package, load it onto your stuffing horn and you are good to go!
Let us know if you have any other questions!
Jonathon Thank you for your quick and detailed response. It is greatly appreciated. Just another reason why Walton’s is the best. For some reason, I thought that you needed to soak the collagen before loading it on the stuffing horn. Thanks for the correction there.
-
hharris We recommend pork fat because it has a creaminess to it that other animals fats really don’t match. For example I can cleary tell the difference in texture and taste when I am making pork brats or snack sticks vs when I have used beef. Part of the taste difference is in how the fat coats your mouth it allows it to linger longer. Also, when you are making a product that you would want particle definition on (salami, pepperoni and some bolonga) the back fat from a hog is nice and firm and displays really nicely. Now, some people object to pork for either health or religious reasons so adding beef fat can and very often is substituted!
Don’t rinse, or soak your collagen just take it right out of the package, load it onto your stuffing horn and you are good to go!
Let us know if you have any other questions!
-
hharris Yes, you could use pork butts for sure to make up the difference as long as you stay in the 20-30 fat percentage. When doing deer a lot of people do 50/50 deer to pork trimmings or pork butts. It can be a little easier this way and you get more out of your deer!
-
hharris Yes, you could use pork butts for sure to make up the difference as long as you stay in the 20-30 fat percentage. When doing deer a lot of people do 50/50 deer to pork trimmings or pork butts. It can be a little easier this way and you get more out of your deer!
-
hharris We recommend pork fat because it has a creaminess to it that other animals fats really don’t match. For example I can cleary tell the difference in texture and taste when I am making pork brats or snack sticks vs when I have used beef. Part of the taste difference is in how the fat coats your mouth it allows it to linger longer. Also, when you are making a product that you would want particle definition on (salami, pepperoni and some bolonga) the back fat from a hog is nice and firm and displays really nicely. Now, some people object to pork for either health or religious reasons so adding beef fat can and very often is substituted!
Don’t rinse, or soak your collagen just take it right out of the package, load it onto your stuffing horn and you are good to go!
Let us know if you have any other questions!
Jonathon Iam trying to make a snack stick or slightly larger “stick” using moose meat and pork meat. I was using 75-25% moose ratio . I want to add pork fat, what would be a good ratio? Would like to use a collagen casing and would like to get the wrinkle look like the ones you buy, can you get this with collagen casings? I recently bought some German salami that had the wrinkle look and it was a drier/ harder type than you usually see so would like to get it like that plus it was delicious.
-
revid So the moose is already 75-25 fat to lean? If that is the case you don’t want to add much more pork fat. Generally maybe 5-10% at the most BUT since you want that wrinkled look then a slightly higher fat content might be a good thing. You could do a few things, cook it at a higher temp towards the end, dont put it in an ice bath right away or toss it in a dehydrator after cooking for an hour or so? Just some ideas, I’d be happy to see if anyone had any other ones?
-
revid So the moose is already 75-25 fat to lean? If that is the case you don’t want to add much more pork fat. Generally maybe 5-10% at the most BUT since you want that wrinkled look then a slightly higher fat content might be a good thing. You could do a few things, cook it at a higher temp towards the end, dont put it in an ice bath right away or toss it in a dehydrator after cooking for an hour or so? Just some ideas, I’d be happy to see if anyone had any other ones?
Jonathon thanks but for response. The moose I use is very lean. I make 10# batches using 7 lbs moose,3 # pork and 2# pork fat. Only new to this so that’s what I tried so far. Used smaller collagen casings 19mm but would like to try a little bigger. Just used spices and Prague powder but read people are using other things in addition which I can’t remeber now lol. I can’t get that wrinkle look so wondering and thinking Iam not doing something right.
-
revid Most people want a fairly smooth casing with maybe some wrinkling, so I would say you ARE doing something right even if you aren’t trying to do it! I would always recommend you go with a prepackaged seasoning and sure cure (same thing as prague powder) and with snack sticks I like to use a binder like Super Bind or Carrot Fiber. If you really want a wrinkle appearance though I would probably up your water content and NOT use a binder and then cook it at something around 190° during your last stage. If that doesn’t work then toss them in the dehydrator for a few hours as I said.
Your fat content is probably pretty close to spot on! If you have any pics of the moose you get then I am sure the Bragging Board section would love to see them!
-
revid Most people want a fairly smooth casing with maybe some wrinkling, so I would say you ARE doing something right even if you aren’t trying to do it! I would always recommend you go with a prepackaged seasoning and sure cure (same thing as prague powder) and with snack sticks I like to use a binder like Super Bind or Carrot Fiber. If you really want a wrinkle appearance though I would probably up your water content and NOT use a binder and then cook it at something around 190° during your last stage. If that doesn’t work then toss them in the dehydrator for a few hours as I said.
Your fat content is probably pretty close to spot on! If you have any pics of the moose you get then I am sure the Bragging Board section would love to see them!
Jonathon thanks bud for the info. How much water and binder would you recommend to use for the batch I stated? Is there any different between the two you suggested? Iam using a Bradley smoker and finding it hard to get up to that temp . I usually smoke for an hour then just heat.
-
Jonathon So this may seem like a really dumb question, but how do you hang the meat in the smoker. I assume I just loop over the smoke stick and then make one big continuous loop across the stick alternating up across and down from side to side over the smoke stick until I get it all on there? I assume if I cut prior to cooking my 30% fat to meat ratio would mean it would heat up to melt the pork fat and I would have meat running out of casings to the bottom of my smoker.
SierraPete What I do is resist the temptation to make the longest snack stick possible. I know its difficult to gauge the amount of casing you slide on the stuffing tube, but I try to go about half way. That way I have 2 -3 feet of snack stick not 4 or 5 feet.
I let those long snack sticks “rest” for about a day and right before I use them, I use a sharp knife and cut them to size then put them in the smoker or oven - providing you have trays to place them on …
-
revid Super Bind is a combination of Carrot Fiber and Potato Starch, so you get water holding capacity from Carrot Fiber and the Potato Starch Gels at right about the same temperature that meat starts to really expel water, so it is able to absorb it. Super Bind is a little more expensive but is generally worth it in my mind, especially when using some wild game that you worked so hard to get. Carrot Fiber is a binder that holds 26 times its weight in water so it is very helpful in yield enhancement and giving you a juicier finished product.
If you are using 7 lb of Moose, 2lb pork fat and 3 lb of the regular pork I would use about 14-16 oz of water and 5 oz of Super Bind or 2 oz of Carrot Fiber.
-
revid Super Bind is a combination of Carrot Fiber and Potato Starch, so you get water holding capacity from Carrot Fiber and the Potato Starch Gels at right about the same temperature that meat starts to really expel water, so it is able to absorb it. Super Bind is a little more expensive but is generally worth it in my mind, especially when using some wild game that you worked so hard to get. Carrot Fiber is a binder that holds 26 times its weight in water so it is very helpful in yield enhancement and giving you a juicier finished product.
If you are using 7 lb of Moose, 2lb pork fat and 3 lb of the regular pork I would use about 14-16 oz of water and 5 oz of Super Bind or 2 oz of Carrot Fiber.
-
Jonathon thanks bud going to order some of that super bind now! Now anyone have a fav seasoning mix for game???
revid You can’t go wrong with the Willie’s, my family and I love it.
-

How To Make Homemade Snack Sticks
Learn how to make homemade snack sticks with Walton's and Meatgistics. Watch the video, read the guide, and then post your questions or comments below
What Is A Snack Stick?
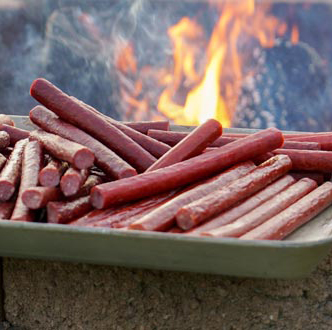
Snack Sticks are a meat snack and semi-dried sausage that are stuffed into a small diameter casing. Typically a collagen casing is used, but it is also acceptable to use natural casings or even make skinless snack sticks. Most snack sticks have a low pH from around 4.5 to 5.2, which is what gives them that familiar tangy flavor and is what helps aid in shelf stability. Another aid for shelf stability is a low water activity, which means binding water in the meat snacks to make it unavailable to support microbial growth. Water activity is not something that can be measured by a home meat processor, but we still set up our process and thermal processing to attempt to achieve a lower water activity. Snack sticks can be made from just about any type of meat, from beef, pork, chicken, other poultry, wild game, or a combination of meats. Walton’s recommends using a lean to fat ratio of at least 80/20, and many times a 30% fat ratio, with a maximum of 40% fat. Fat is where most of your flavor comes from so changing your lean to fat ratio will change the overall taste and mouthfeel of your product.
Meat Block
25lb 80/20 beef trim 1
Additives
1 package Excalibur Snack Stick Seasoning
1oz Sure Cure 2
6oz Sure Gel Meat Binder 3
4oz Encapsulated Citric Acid 4
2 to 3 lb High Temperature Cheese
19mm Collagen Casings
1 Quart Ice Cold Water 5
Process
Start the initial grind with a 3/8in (10mm) grinder plate, then grind a second time through a 1/8in (3mm) grinder plate. Always use a sharp grinder knife and plate. This will help you retain a better particle definition, color, and help prevent any smearing of the meat. If you cannot easily distinguish the lean from the fat when grinding, then it may be time for a new grinder plate and knife.
Meat Mixing
Using a meat mixer is preferred to hand mixing when making snack sticks. We need to make sure we get a lot of protein extraction, and that is a bit more difficult to achieve in hand mixing but still a possibility to do if you don’t have an actual meat mixer. We are going to want to mix for about 8 minutes, and we’ll want to reverse the direction of the mixing paddles every 1 minute. When you start the mixer, just start adding all the ingredients, except the Encapsulated Citric Acid and High Temp Cheese. These last two ingredients can be added in the last 45-60 seconds of the cycle, or just long enough to evenly disperse. Over mixing Encapsulated Citric Acid could lead to breaking the encapsulate and over mixing the cheese can lead to smearing and loss of shape.

Sausage Stuffing
Avoid creating air pockets when you load your sausage stuffer and begin stuffing until the casings are full with a smooth exterior. We will stuff into as long of ropes as we can, and then we’ll cut them to length when we actually hang on smoke sticks in the smokehouse.
Thermal Processing
For information on adding humidity to your smoke schedule go HERE
Either hang on smoke sticks or lay on racks in your smokehouse or oven. Just be sure to leave a slight gap between the snack sticks. A simple cooking schedule you can follow is here:
125F for 1 hour
140F for 1 hour
155F for 2 hours
175F until internal meat temp of 160FCooling
To help set the casing to the meat and also prevent wrinkling we need to shower the snack sticks when they are done cooking or put them in an ice water bath. It should only take around 10 minutes to get the temperature to drop down. Then, we’ll let them set out for about 1 hour before moving to the refrigerator/freezer. After we are totally done with the cooling process, then we will package in vacuum pouches for longer term storage.

Wrap up
It’s easy to get the basics on making snack sticks, but practice does make perfect. Walton’s has everything you need (except the meat) to make great snack sticks, plus we have the knowledge to help you perfect your own process. If you have any questions or need help in your process, please share your questions or comments below.
Notes
- Using a binder like Carrot Fiber, or Soy Protein Blend will not change how much water you put into your product.
- Place a small pan of water in the bottom of smokehouse during the entire cooking cycle to help increase humidity
If your smoker, smokehouse, dehydrator, or oven cannot reach temperatures as low as 125F, just start as low as possible and slowly increase the temperature over time
FootNotes
1. Or use 18 lb wild game meat and 7 lb pork fat or beef fat, though beef fat will have different texture and taste (Return to text)
2. Sure Cure packet is included with seasoning (Return to text)
3. Instead of Sure Gel also try 4 oz of Carrot Fiber (Return to text)
4. If you do not use a cure accelerator like Encapsulated Citric Acid or Smoked Meat Stabilizer, then after it has been stuffed into its casing hold in a refrigerator for approximately 12 hours or overnight (Return to text)
5. For Home Processors 2 Qts Will Make Stuffing Easier (Return to text)Watch WaltonsTV: How To Make Snack Sticks
Austin
I tried making snack sticks for the second time. This time I added citric acid for some tang. The mix never got sticky and when I stuffed the casing it was not smooth and the water seperated and ran out on the counter top. The meat was like little seperated lumps in the casings. After cooking, they tasted good, but the texture was like compressed saw dust.




Hello! It looks like you're interested in this conversation, but you don't have an account yet.
Getting fed up of having to scroll through the same posts each visit? When you register for an account, you'll always come back to exactly where you were before, and choose to be notified of new replies (either via email, or push notification). You'll also be able to save bookmarks and upvote posts to show your appreciation to other community members.
With your input, this post could be even better 💗
Register LoginSponsored By:

