PID controllers, temp & humidity: brand? WiFi?
-
samspade thanks much!
Dave in AZ You can find PID’s that come as kits and many times you can select the temp probe and an SSR in the kit. That makes sure everything is compatible
One thing to verify is the temperature range, many PID’s are for brewing and seed bed starters and have too low of a temperature range for a smoker -
processhead thx very much Paul, good info. Right now I’m leaning towards the 2 Inkbird PIDs for temp and humidity, just because they’re the ones I have actual successful user reports on. I will probably get the wifi versions, as all the analysis and testing info is available thru the app, but very little thru the unit limited screens; and your comment on self tuning makes me think the more robust controls suite via the appmight be worth it.
I also plan on using a relay, the Omron one mentioned above looks decent, though $29 for a relay seems high… but I don’t have the time to learn about PIDs and relays and become expert enough to make my own 1st time purchase decisions right now. So hoping to rely on folks like you all, with more knowledge and firsthand experience of “THIS ONE works!”
Thx!Dave in AZ Be happy to help in any way I can.
-
processhead thx very much Paul, good info. Right now I’m leaning towards the 2 Inkbird PIDs for temp and humidity, just because they’re the ones I have actual successful user reports on. I will probably get the wifi versions, as all the analysis and testing info is available thru the app, but very little thru the unit limited screens; and your comment on self tuning makes me think the more robust controls suite via the appmight be worth it.
I also plan on using a relay, the Omron one mentioned above looks decent, though $29 for a relay seems high… but I don’t have the time to learn about PIDs and relays and become expert enough to make my own 1st time purchase decisions right now. So hoping to rely on folks like you all, with more knowledge and firsthand experience of “THIS ONE works!”
Thx!Dave in AZ I did forget the temp limit. My 310t stops at 240. So it really may not work in some applications. I mainly use it to step up my sausage and jerkys.
-
Dave in AZ I did forget the temp limit. My 310t stops at 240. So it really may not work in some applications. I mainly use it to step up my sausage and jerkys.
samspade no worries. I got the inkbird ITC308 wifi. Just using it for drying cabinet control, so it’s 100c top is fine also.
-
samspade no worries. I got the inkbird ITC308 wifi. Just using it for drying cabinet control, so it’s 100c top is fine also.
Dave in AZ great. As someone said to me… if you dont post pics it didnt happen. Look forward to your build photos.
-
Building my drying chamber. Saw a few good videos by 2guys and a cooler, he uses InkBird controllers. I see there are a ton of brands, some really cheap and not as plug and play, like if I was breadboarding up something.
What do folks think are best brands to buy, how are these Inkbird ones, and are the wifi versions you can program and monitor on phone worth using?
Thx!(Seems to me I would program these once with their instruction book then never mess except setting temp or humidity, so doubting wifi utility…)
Dave in AZ I use PID in my brewing, but for my drying chamber I use this and it is simple and really easy to view and use.
Inkbird Temperature and Humidity Controller ITC-608T Pre-Wired Dual Stage Thermostat 120VAC 15A 1800W ETL Listed
-
Dave in AZ I use PID in my brewing, but for my drying chamber I use this and it is simple and really easy to view and use.
Inkbird Temperature and Humidity Controller ITC-608T Pre-Wired Dual Stage Thermostat 120VAC 15A 1800W ETL Listed
mrobisr said in PID controllers, temp & humidity: brand? WiFi?:
Dave in AZ I use PID in my brewing, but for my drying chamber I use this and it is simple and really easy to view and use.
Inkbird Temperature and Humidity Controller ITC-608T Pre-Wired Dual Stage Thermostat 120VAC 15A 1800W ETL Listed
Not to derail the thread mrobisr, but are you doing electric mashing and boiling? RIMS?
Paul
-
mrobisr said in PID controllers, temp & humidity: brand? WiFi?:
Dave in AZ I use PID in my brewing, but for my drying chamber I use this and it is simple and really easy to view and use.
Inkbird Temperature and Humidity Controller ITC-608T Pre-Wired Dual Stage Thermostat 120VAC 15A 1800W ETL Listed
Not to derail the thread mrobisr, but are you doing electric mashing and boiling? RIMS?
-
mrobisr said in PID controllers, temp & humidity: brand? WiFi?:
Dave in AZ I use PID in my brewing, but for my drying chamber I use this and it is simple and really easy to view and use.
Inkbird Temperature and Humidity Controller ITC-608T Pre-Wired Dual Stage Thermostat 120VAC 15A 1800W ETL Listed
Not to derail the thread mrobisr, but are you doing electric mashing and boiling? RIMS?
processhead
mrobisr
Dang this is a great place, so many folks with like minded interests!
Well, I haven’t met anyone who knew what RIMS was for 15 years! So, might as well go off topic since I’m kinda excited to find some brewers using it!
I have a RIMS system I built in 1992 or 93 based off original article published in Zymurgy by Rodney Morris. He laid out the circuit board, thermistor setup etc, but not all details. I flew out to college Station where he was teaching and got his full circuit design. My setup uses a surgical mag drive blood pump from Grainger, low heat density folded element in a copper tube w thermistors either end, driven by Morris’s circuit breadboarded up inside a plywood box. All with 16gal straight wall kegs I got from a buddy who owned the Bud distributorship. This was all before anything was available for sale commercially I think.I sparge in a hmm, 10gal? Gatorade cooler with a false filter bottom and sparge arm they were selling back then. Counterflow coiled copper inside a hose cooler.
Had 2 fridges modified w grainger or White Rodgers thermostats for 30 to 75, <1 deg swings for ferments or storage/serving. Ferment in 6 or 11gal carboys. Then Ive got a bunch of 5 gal Cornelius kegs. Did some yeat work too.All piled in my casita now, haven’t brewed in 10 years
 I need to retire, to have more time for these great hobbies! Sooo much easier now with Amazon, internet, and guys like you all to instantly get info and experience from! I guess that circuit I got from Morris was a simple PID, but it’s so much nicer now to just order an Inkbird in 5 min!
 -
Dave in AZ I use PID in my brewing, but for my drying chamber I use this and it is simple and really easy to view and use.
Inkbird Temperature and Humidity Controller ITC-608T Pre-Wired Dual Stage Thermostat 120VAC 15A 1800W ETL Listed
mrobisr thx, I saw that one. Ended up going with the 2 separate ones with wifi controls app that Eric at 2 guys and a cooler details.
-
processhead
mrobisr
Dang this is a great place, so many folks with like minded interests!
Well, I haven’t met anyone who knew what RIMS was for 15 years! So, might as well go off topic since I’m kinda excited to find some brewers using it!
I have a RIMS system I built in 1992 or 93 based off original article published in Zymurgy by Rodney Morris. He laid out the circuit board, thermistor setup etc, but not all details. I flew out to college Station where he was teaching and got his full circuit design. My setup uses a surgical mag drive blood pump from Grainger, low heat density folded element in a copper tube w thermistors either end, driven by Morris’s circuit breadboarded up inside a plywood box. All with 16gal straight wall kegs I got from a buddy who owned the Bud distributorship. This was all before anything was available for sale commercially I think.I sparge in a hmm, 10gal? Gatorade cooler with a false filter bottom and sparge arm they were selling back then. Counterflow coiled copper inside a hose cooler.
Had 2 fridges modified w grainger or White Rodgers thermostats for 30 to 75, <1 deg swings for ferments or storage/serving. Ferment in 6 or 11gal carboys. Then Ive got a bunch of 5 gal Cornelius kegs. Did some yeat work too.All piled in my casita now, haven’t brewed in 10 years
I need to retire, to have more time for these great hobbies! Sooo much easier now with Amazon, internet, and guys like you all to instantly get info and experience from! I guess that circuit I got from Morris was a simple PID, but it’s so much nicer now to just order an Inkbird in 5 min!Dave in AZ mrobisr
Since we have some brewers here I will post a few pictures of my RIMS system that I build about 12 years ago. I have made a few modifications over the years but the basic design has stayed about the same.Here is the control panel. The top PID is the temperature control for the RIMS in-line heater.
The middle Inkbird temperature control is a basic on-off control for the hot liquor tank.
The lower left switch is for the RIMS recirculation pump and is interlocked with the RIMS element so the element can’t come on unless the pump is running. This avoids scorching the mash if there is no flow.
The lower middle knob is pulse width modulated control for the electric boil kettle element. It allows rapid heat heat up of the 5500 watt boil kettle element and then throttling back the power after boil is achieved to limit boil overs.
The switch on the lower right is the master power switch.

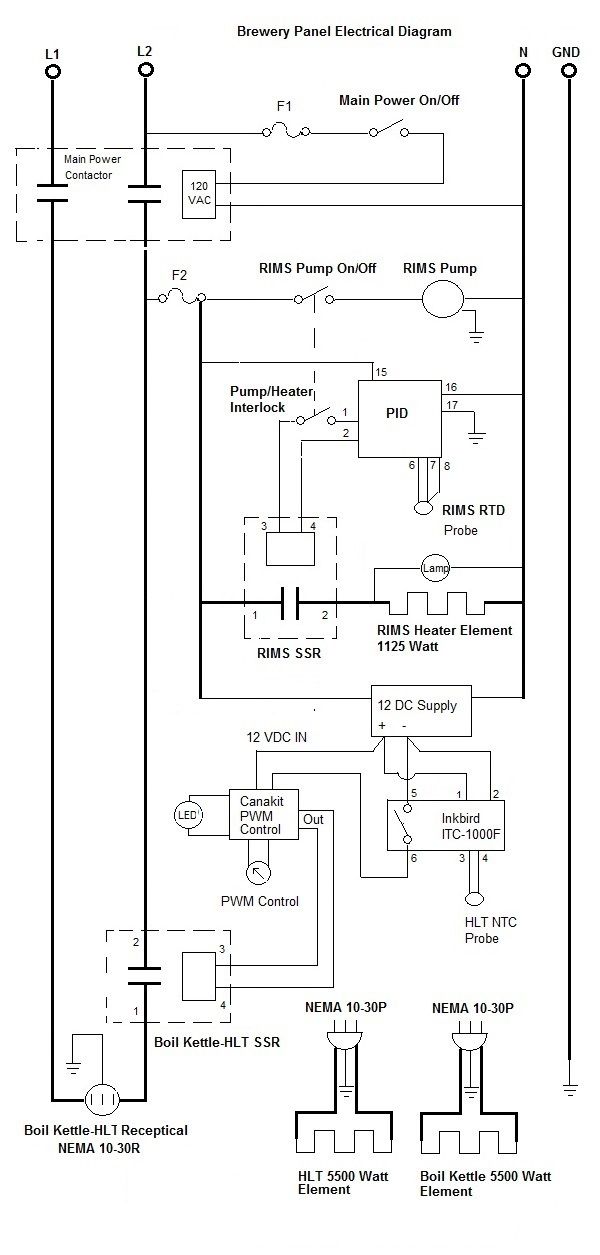
Panel schematic
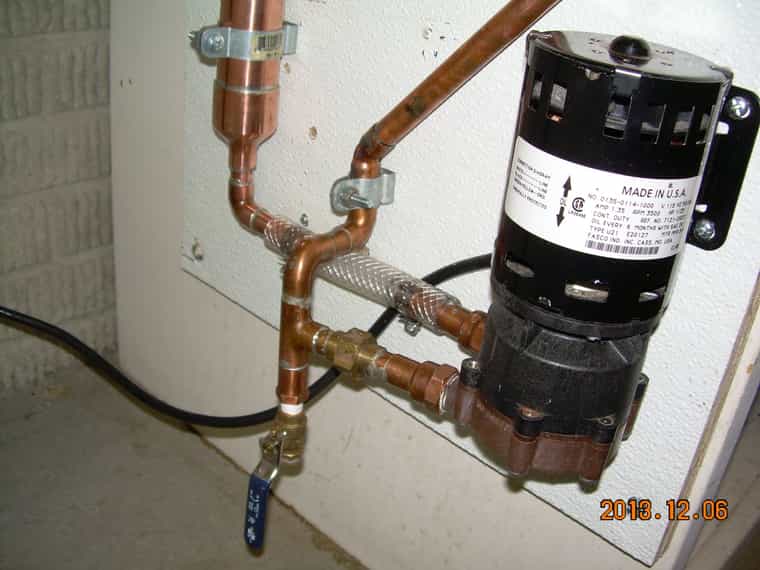
Here is the recirculating pump.
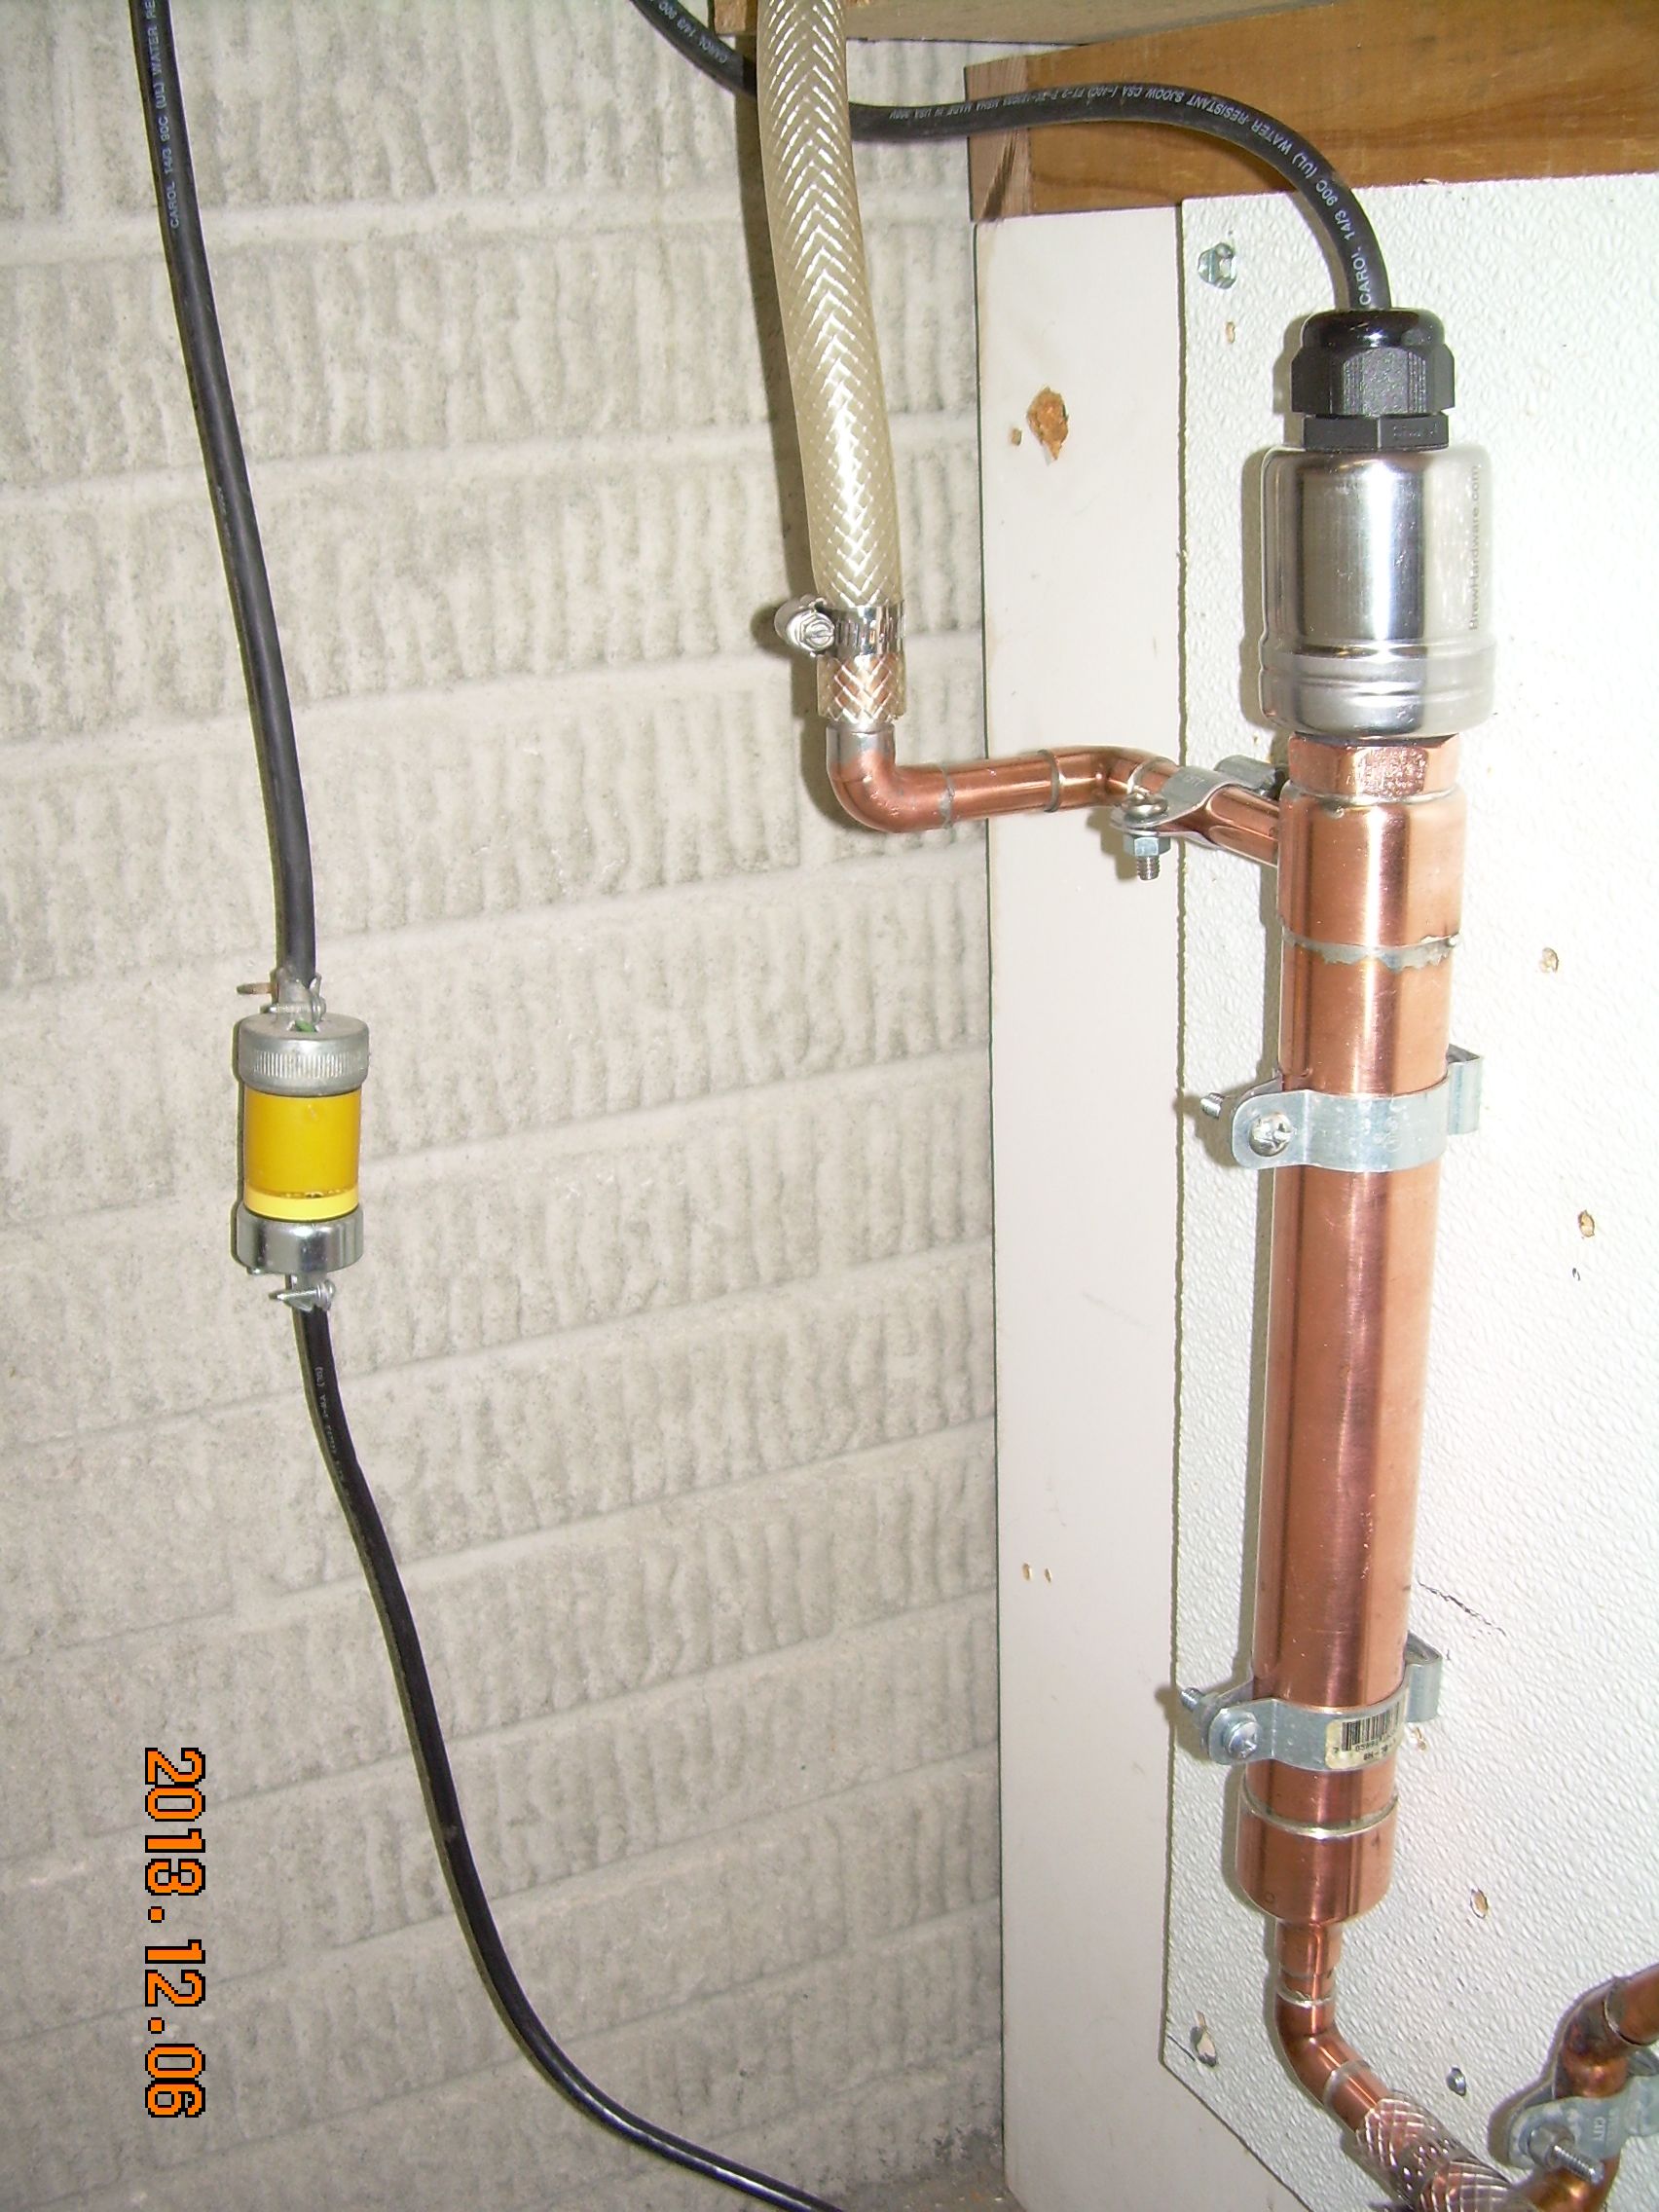
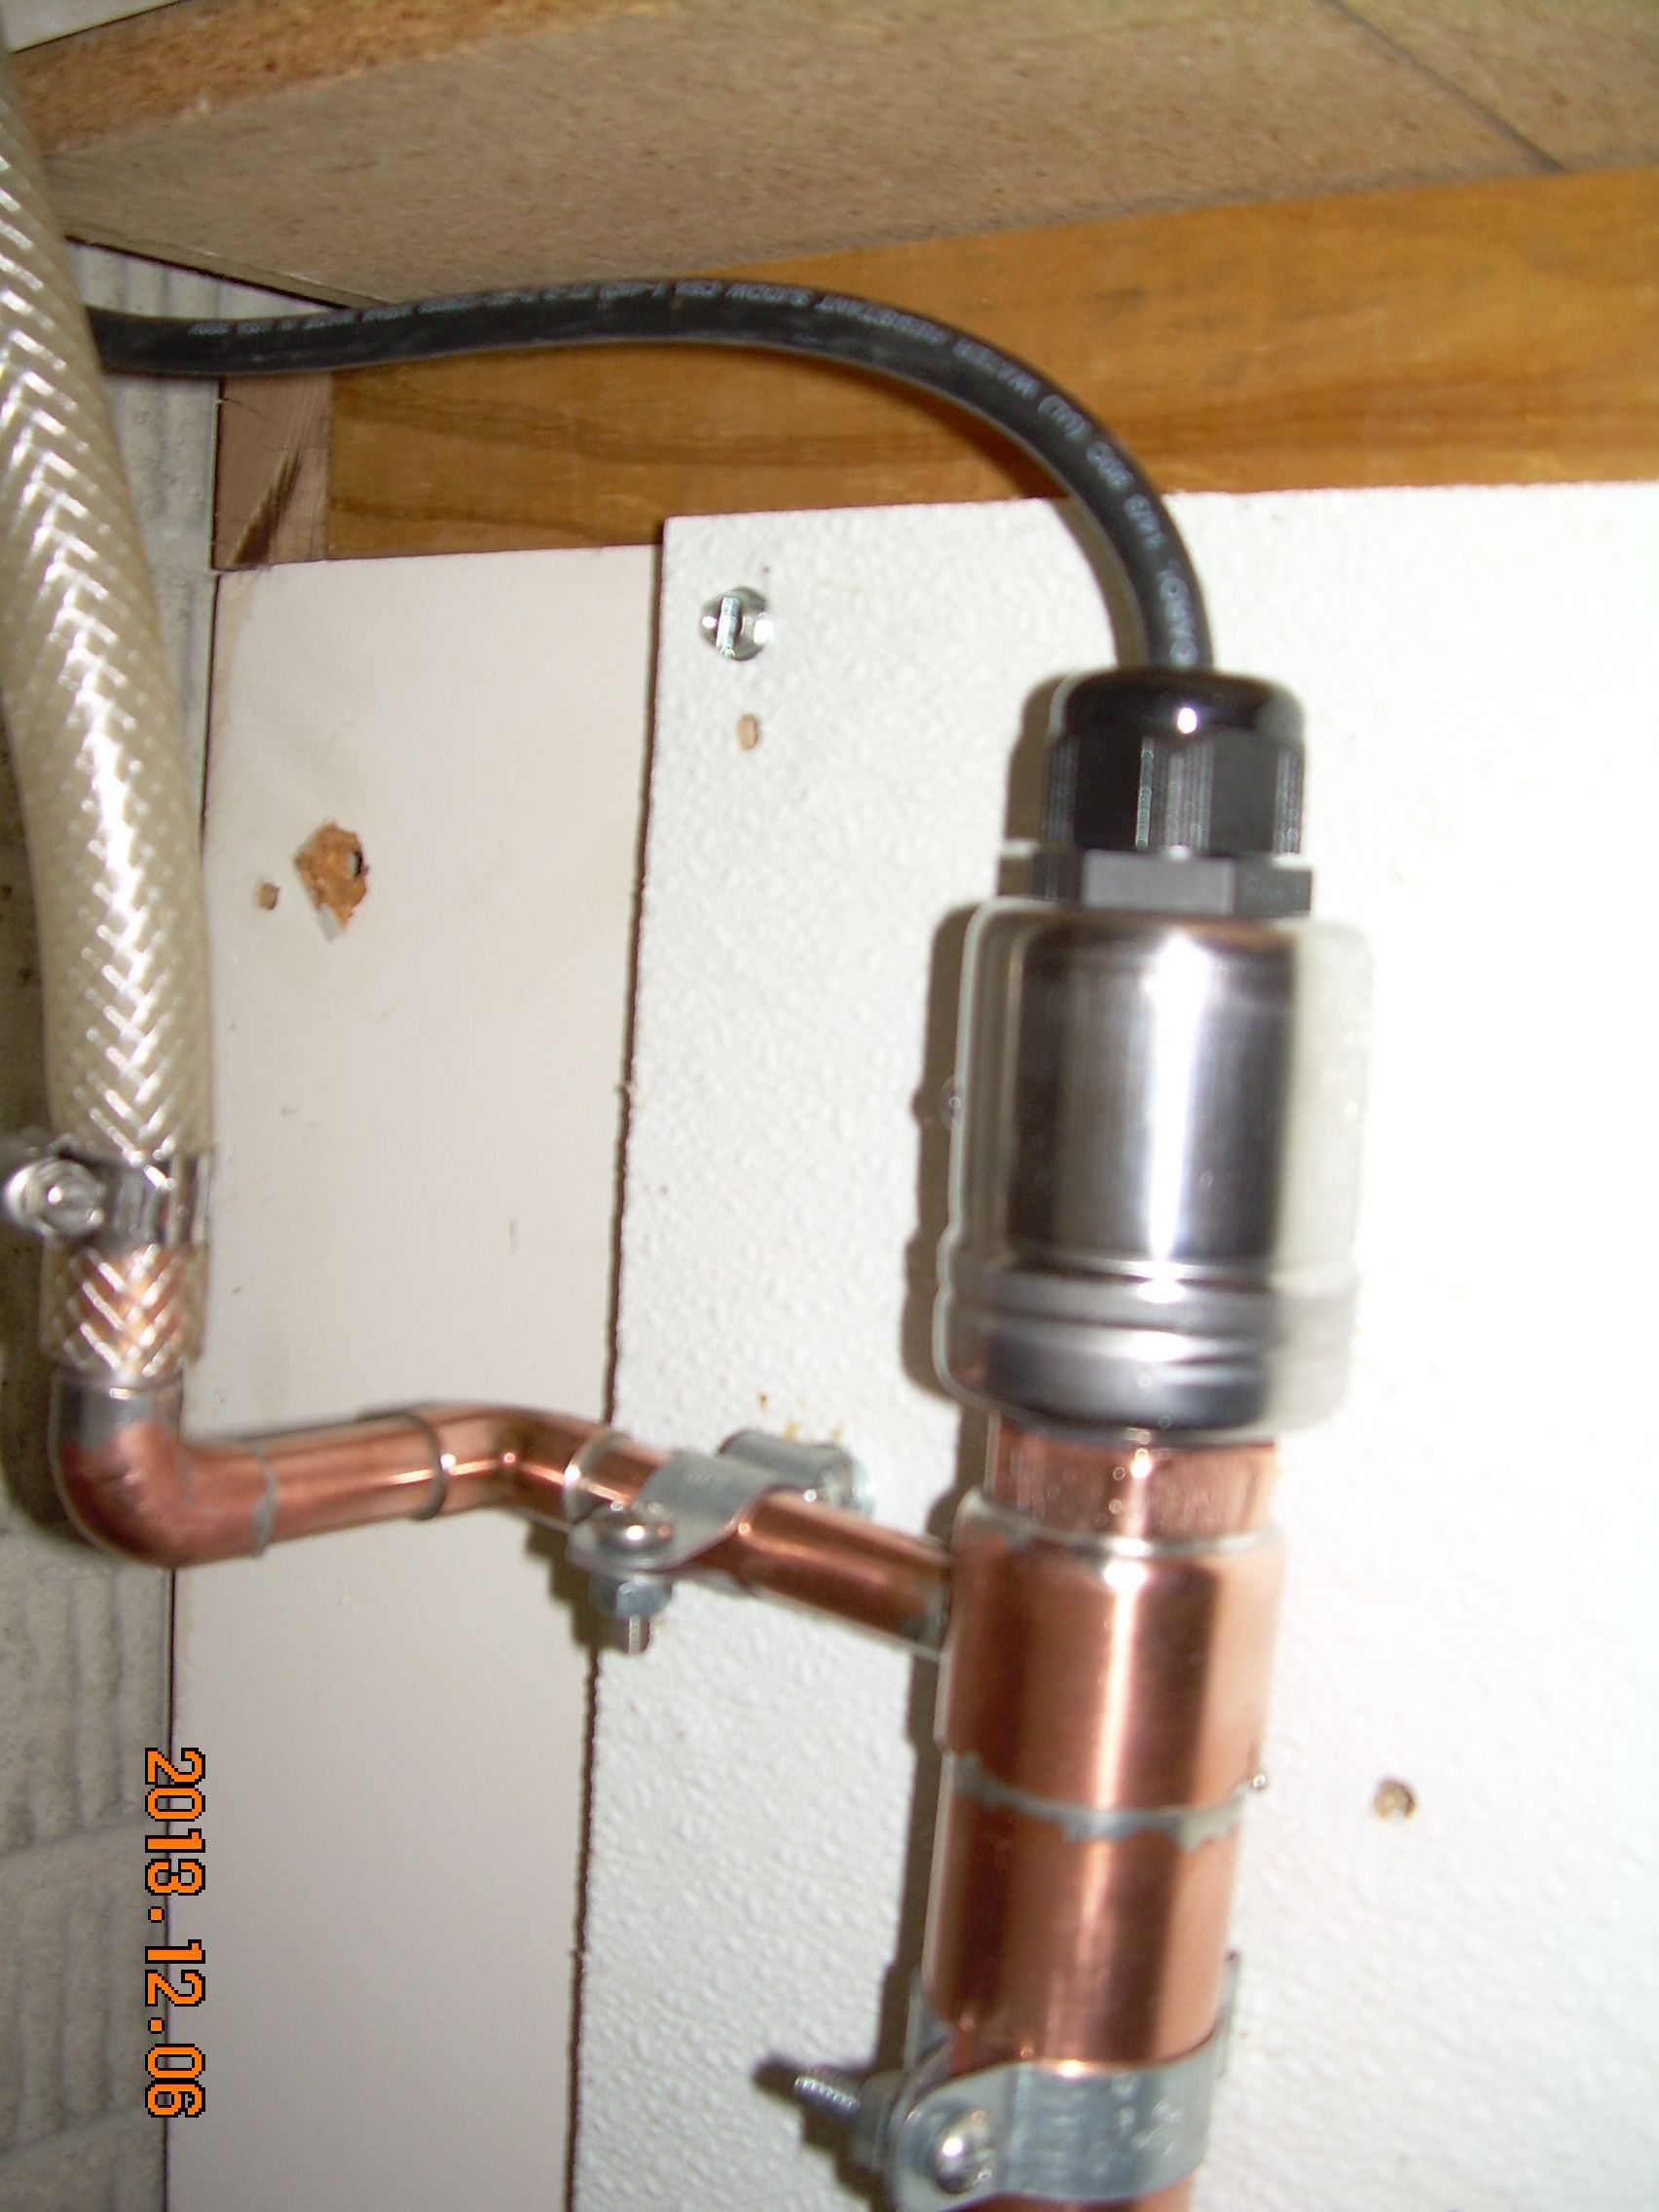
Here is the RIMS inline element housing. On the inside is a 4500 watt 220 volt element operated on 120 volts to limit power output to 1125 watts and lower the heat density.
Paul
-
Dave in AZ mrobisr
Since we have some brewers here I will post a few pictures of my RIMS system that I build about 12 years ago. I have made a few modifications over the years but the basic design has stayed about the same.Here is the control panel. The top PID is the temperature control for the RIMS in-line heater.
The middle Inkbird temperature control is a basic on-off control for the hot liquor tank.
The lower left switch is for the RIMS recirculation pump and is interlocked with the RIMS element so the element can’t come on unless the pump is running. This avoids scorching the mash if there is no flow.
The lower middle knob is pulse width modulated control for the electric boil kettle element. It allows rapid heat heat up of the 5500 watt boil kettle element and then throttling back the power after boil is achieved to limit boil overs.
The switch on the lower right is the master power switch.
Panel schematic
Here is the recirculating pump.
Here is the RIMS inline element housing. On the inside is a 4500 watt 220 volt element operated on 120 volts to limit power output to 1125 watts and lower the heat density.
processhead wow! Just Wow!
-
Dave in AZ mrobisr
Since we have some brewers here I will post a few pictures of my RIMS system that I build about 12 years ago. I have made a few modifications over the years but the basic design has stayed about the same.Here is the control panel. The top PID is the temperature control for the RIMS in-line heater.
The middle Inkbird temperature control is a basic on-off control for the hot liquor tank.
The lower left switch is for the RIMS recirculation pump and is interlocked with the RIMS element so the element can’t come on unless the pump is running. This avoids scorching the mash if there is no flow.
The lower middle knob is pulse width modulated control for the electric boil kettle element. It allows rapid heat heat up of the 5500 watt boil kettle element and then throttling back the power after boil is achieved to limit boil overs.
The switch on the lower right is the master power switch.
Panel schematic
Here is the recirculating pump.
Here is the RIMS inline element housing. On the inside is a 4500 watt 220 volt element operated on 120 volts to limit power output to 1125 watts and lower the heat density.
processhead yes wow! What a great system! I love the sound of the kettle boil throttle back control! What a nice clean installation! We are for sure going to have to do some brewing threads, and you’re getting me excited to go set mine up again and make improvements! Mine controls pump speed and power to the inline heater to assure a 0.5 degree max increase across element, to avoid scorching wort. I’ve got thermistors embedded on either end of my copper tube, I see you don’t. How do you deal with that for your system, or does it turn out to not be a factor with your element and wort speed?
I’m on a 5day trip but will try to grab a pic when home… being in USAF and moving every 2-3 yrs, and weight limits to Korea etc, I disassembled and packed mine inside keg and box often, taking just the critical parts, then would jury rig it back up on whatever rolling cart I could weld up.
When I made mine, I just copied the circuit and there was no internet, so I couldn’t research the function short of buying a textbook on digital EE controls and reading. I knew just enough EE from a college course to follow his design, and know hiw to get the parts. So it just controls pump speed and power to the inline copper tube element for the mash wort sparge. I don’t have an electric boil, just use propane 100k btu or so under a beer keg with top cut off. I used gravity flow for boil to chiller to primary ferment tank.
Still, being able to accurately replicate timing for alpha, beta amylase rests, lactic, etc, was a complete game changer for me!
-
processhead yes wow! What a great system! I love the sound of the kettle boil throttle back control! What a nice clean installation! We are for sure going to have to do some brewing threads, and you’re getting me excited to go set mine up again and make improvements! Mine controls pump speed and power to the inline heater to assure a 0.5 degree max increase across element, to avoid scorching wort. I’ve got thermistors embedded on either end of my copper tube, I see you don’t. How do you deal with that for your system, or does it turn out to not be a factor with your element and wort speed?
I’m on a 5day trip but will try to grab a pic when home… being in USAF and moving every 2-3 yrs, and weight limits to Korea etc, I disassembled and packed mine inside keg and box often, taking just the critical parts, then would jury rig it back up on whatever rolling cart I could weld up.
When I made mine, I just copied the circuit and there was no internet, so I couldn’t research the function short of buying a textbook on digital EE controls and reading. I knew just enough EE from a college course to follow his design, and know hiw to get the parts. So it just controls pump speed and power to the inline copper tube element for the mash wort sparge. I don’t have an electric boil, just use propane 100k btu or so under a beer keg with top cut off. I used gravity flow for boil to chiller to primary ferment tank.
Still, being able to accurately replicate timing for alpha, beta amylase rests, lactic, etc, was a complete game changer for me!
I don’t do any pump speed control with my system. Just a manual valve on the pump discharge to throttle the flow rate to an optimal l/minute for my system. No issues with scorched wort and the couple of times I pulled the element out to inspect it there were no signs of burned or caramelized sugars on the element, just bare metal. My elements are all ULWD so I think that and the pump/heater interlock helps keep the system idiot proof (good thing).
-
Dave in AZ mrobisr
Since we have some brewers here I will post a few pictures of my RIMS system that I build about 12 years ago. I have made a few modifications over the years but the basic design has stayed about the same.Here is the control panel. The top PID is the temperature control for the RIMS in-line heater.
The middle Inkbird temperature control is a basic on-off control for the hot liquor tank.
The lower left switch is for the RIMS recirculation pump and is interlocked with the RIMS element so the element can’t come on unless the pump is running. This avoids scorching the mash if there is no flow.
The lower middle knob is pulse width modulated control for the electric boil kettle element. It allows rapid heat heat up of the 5500 watt boil kettle element and then throttling back the power after boil is achieved to limit boil overs.
The switch on the lower right is the master power switch.
Panel schematic
Here is the recirculating pump.
Here is the RIMS inline element housing. On the inside is a 4500 watt 220 volt element operated on 120 volts to limit power output to 1125 watts and lower the heat density.
processhead Very nice… my stuff is pieced together and while it works it is not clean looking by any imagination especially compared to yours.




Hello! It looks like you're interested in this conversation, but you don't have an account yet.
Getting fed up of having to scroll through the same posts each visit? When you register for an account, you'll always come back to exactly where you were before, and choose to be notified of new replies (either via email, or push notification). You'll also be able to save bookmarks and upvote posts to show your appreciation to other community members.
With your input, this post could be even better 💗
Register LoginSponsored By:

