Smoker Upgrade!
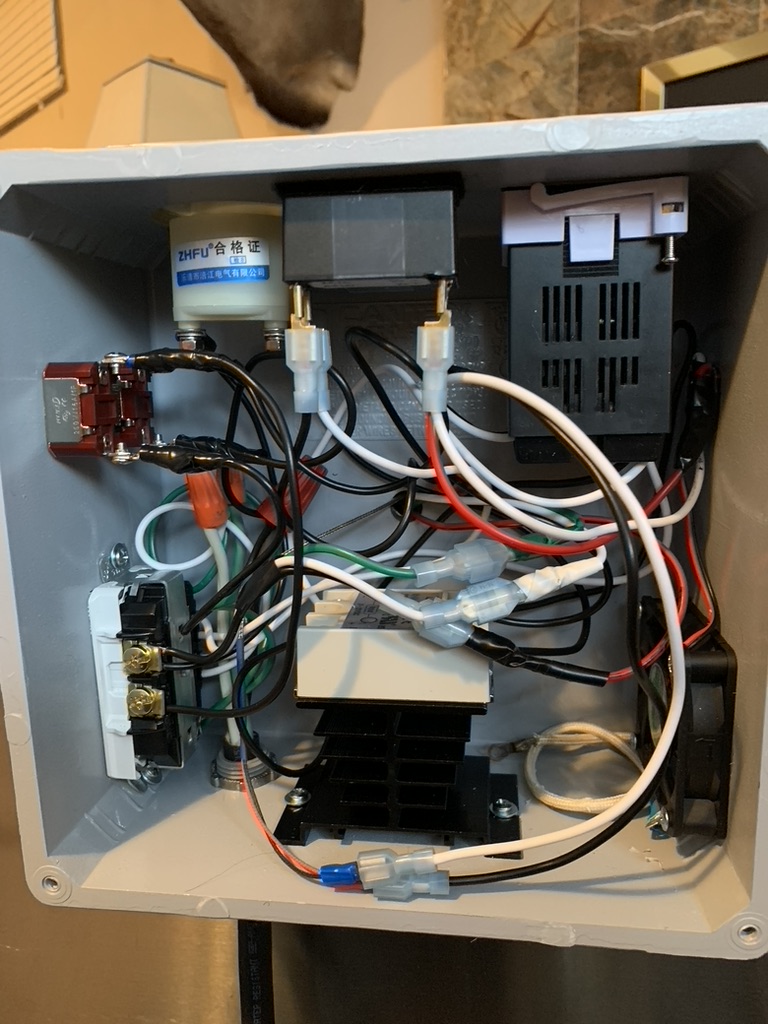
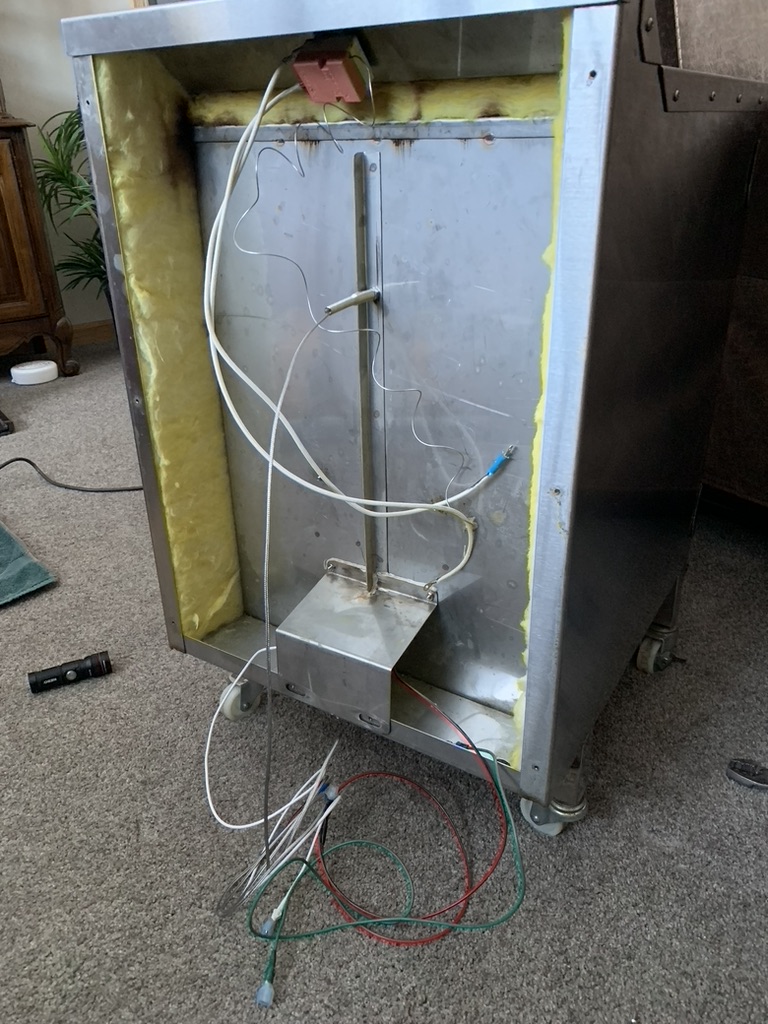
-
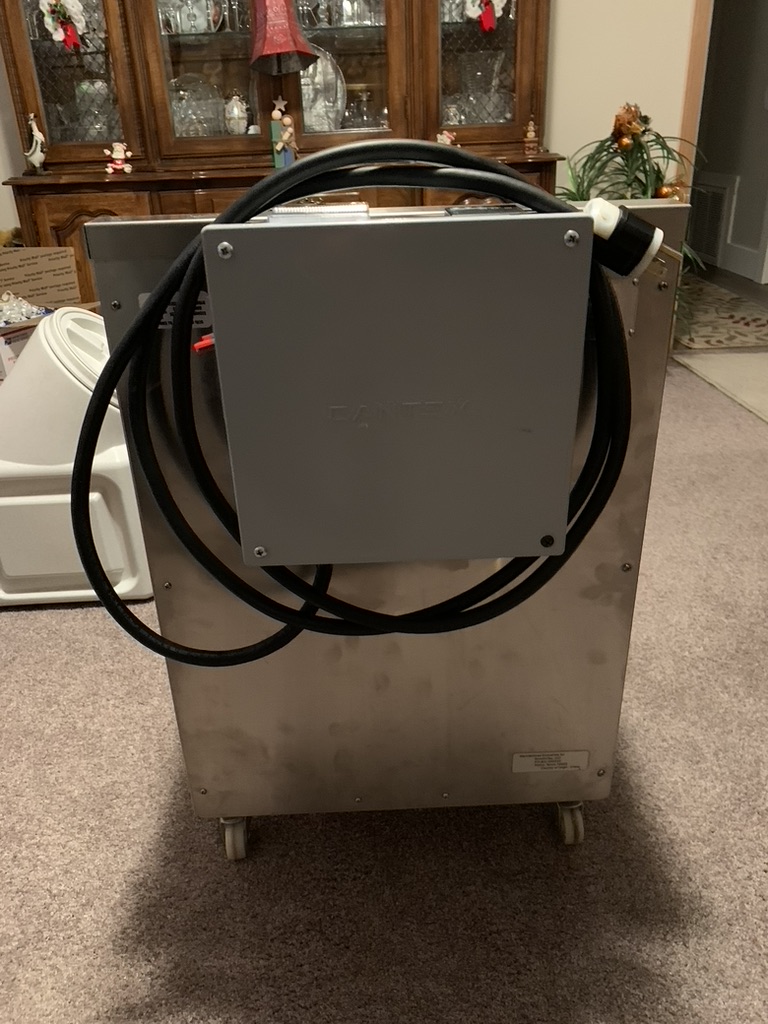
Having an ammeter in the power circuit to the heating element does tell you something usefull that a simple indicator light does not. An ammeter measures the current going through the heating element.
IF your heating element were to fail, there would be no current flow through it and the meter would show this.
A simple indicator light only tells you that the controls are switching voltage on and off to the element, and the light would show this whether the element were working or not.
So an ammeter is kind of a built in diagnostic device for when the the smoker doesn’t heat properly. I probably would not add one to my smoker build, but I also have electrical test equipment that allows me to do the diagnostics without a built in meter.Paul
-
Having an ammeter in the power circuit to the heating element does tell you something usefull that a simple indicator light does not. An ammeter measures the current going through the heating element.
IF your heating element were to fail, there would be no current flow through it and the meter would show this.
A simple indicator light only tells you that the controls are switching voltage on and off to the element, and the light would show this whether the element were working or not.
So an ammeter is kind of a built in diagnostic device for when the the smoker doesn’t heat properly. I probably would not add one to my smoker build, but I also have electrical test equipment that allows me to do the diagnostics without a built in meter.10-4 on that! My smoker has a 700w heating element so even at full draw/current flow, that’s only 5.8amps… (700/120 = 5.8). My ‘analog’ amp meter is a ‘0’ to ‘20’… so I am noticing that its ‘needle’ just barely moves at the lower temp settings. The digital meter on the other hand gives me a readout ‘visually’ (with decimal point) at these lower temps… and their ‘draws’ i.e. amount of current flow. I have to admit, it’s kinda fun seeing & knowing what all is going on inside… and the ‘cost’ of a meter is dirt cheap.
-
Retired157 are you happy overall with the smoker itself? There is a Smoking Tex 1400 on the local buy sell trade site here with little use for a good price. Thinking about pulling the trigger on it.
-
Great post. Can you give more info on the sous vide? Cooler, couplings, etc.? Thanks.
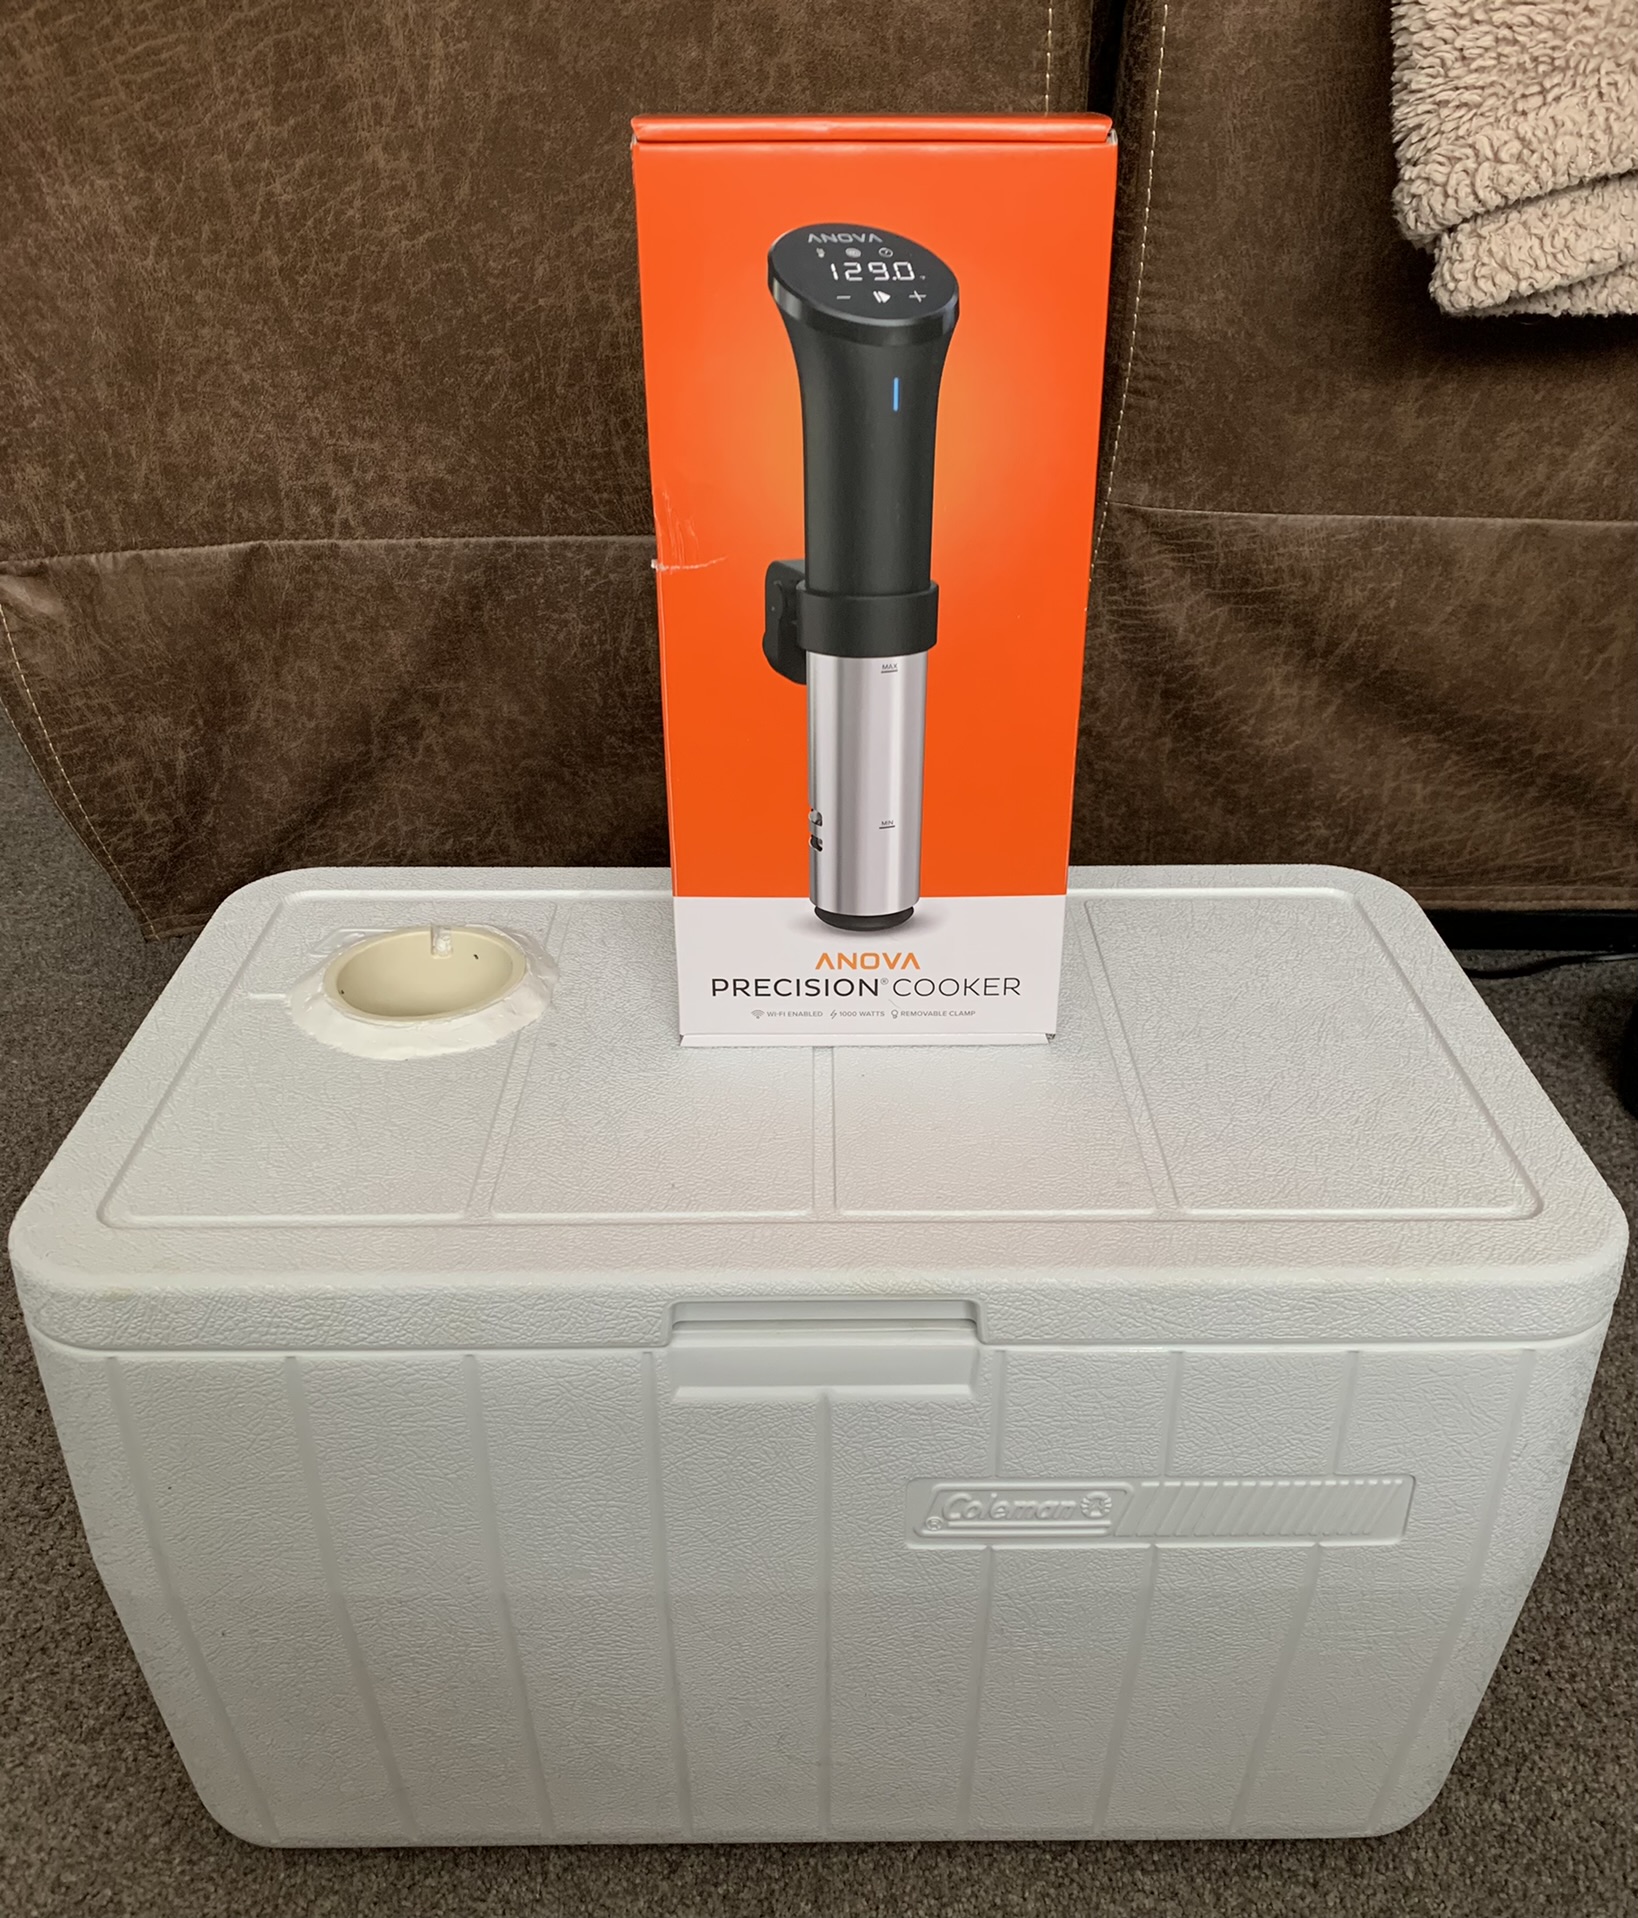
Hey no problem. First, I went with the Anova - 1000w - Sous Vide… so all my ‘measurements’ are specific for it. I bought cooker/cooler from Home Depot… 48quart Coleman. I also bought my Schedule 40 PVC from HD which I used to make/modify my cooler’s lid to hold the Anova. So, here goes…
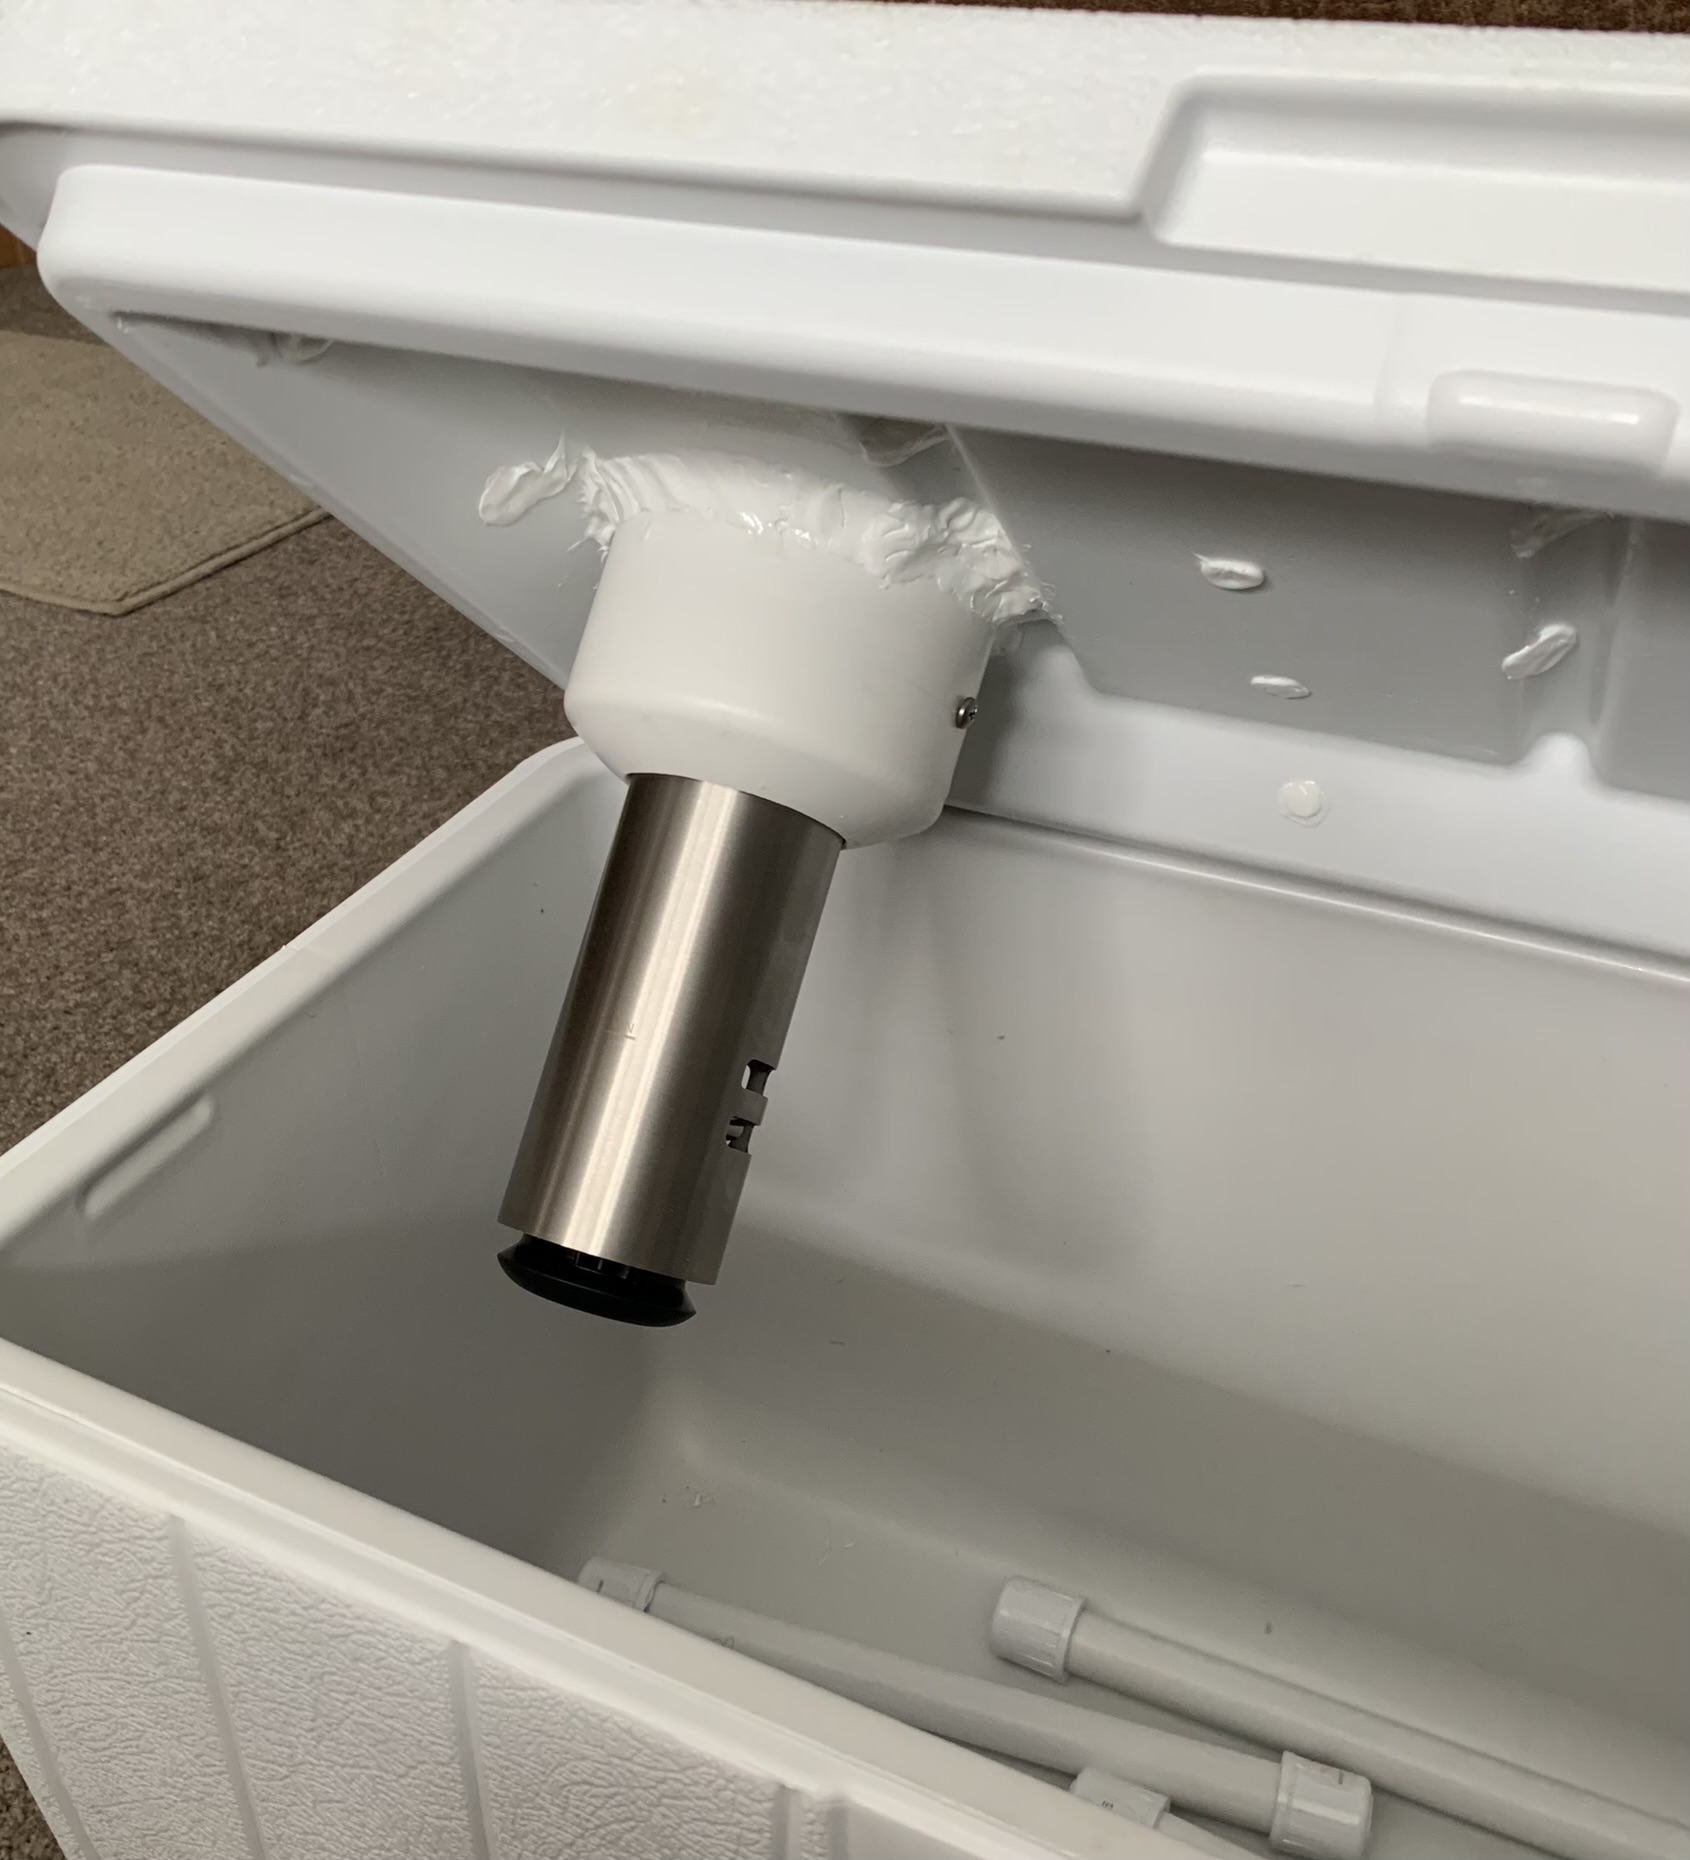
First, I used 3" PVC for this modification. I bought one (2ft) section of 3"… they sell 2ft sections so you don’t have to buy a full length. Then, the only other thing I needed was a 3" cap… easy enough.
Next, thing I needed to do was ‘mark’ dead center (bottom) of my 3" cap. Then, using a 2-3/8" hole saw, I drilled out the cap… this hole now allows my Anova to slide in… nice & secure. After drilling this hole, I cleaned it up nicely with a rattail file.
With the hole done, I glued my 2ft length of 3" pipe in… all the way - bottom it out. You will note in the pic that in addition to gluing these parts together, I also used two sheet metal screws (small @1/2" - 180degrees out from each other) to ensure my two ‘pieces’ never come apart.
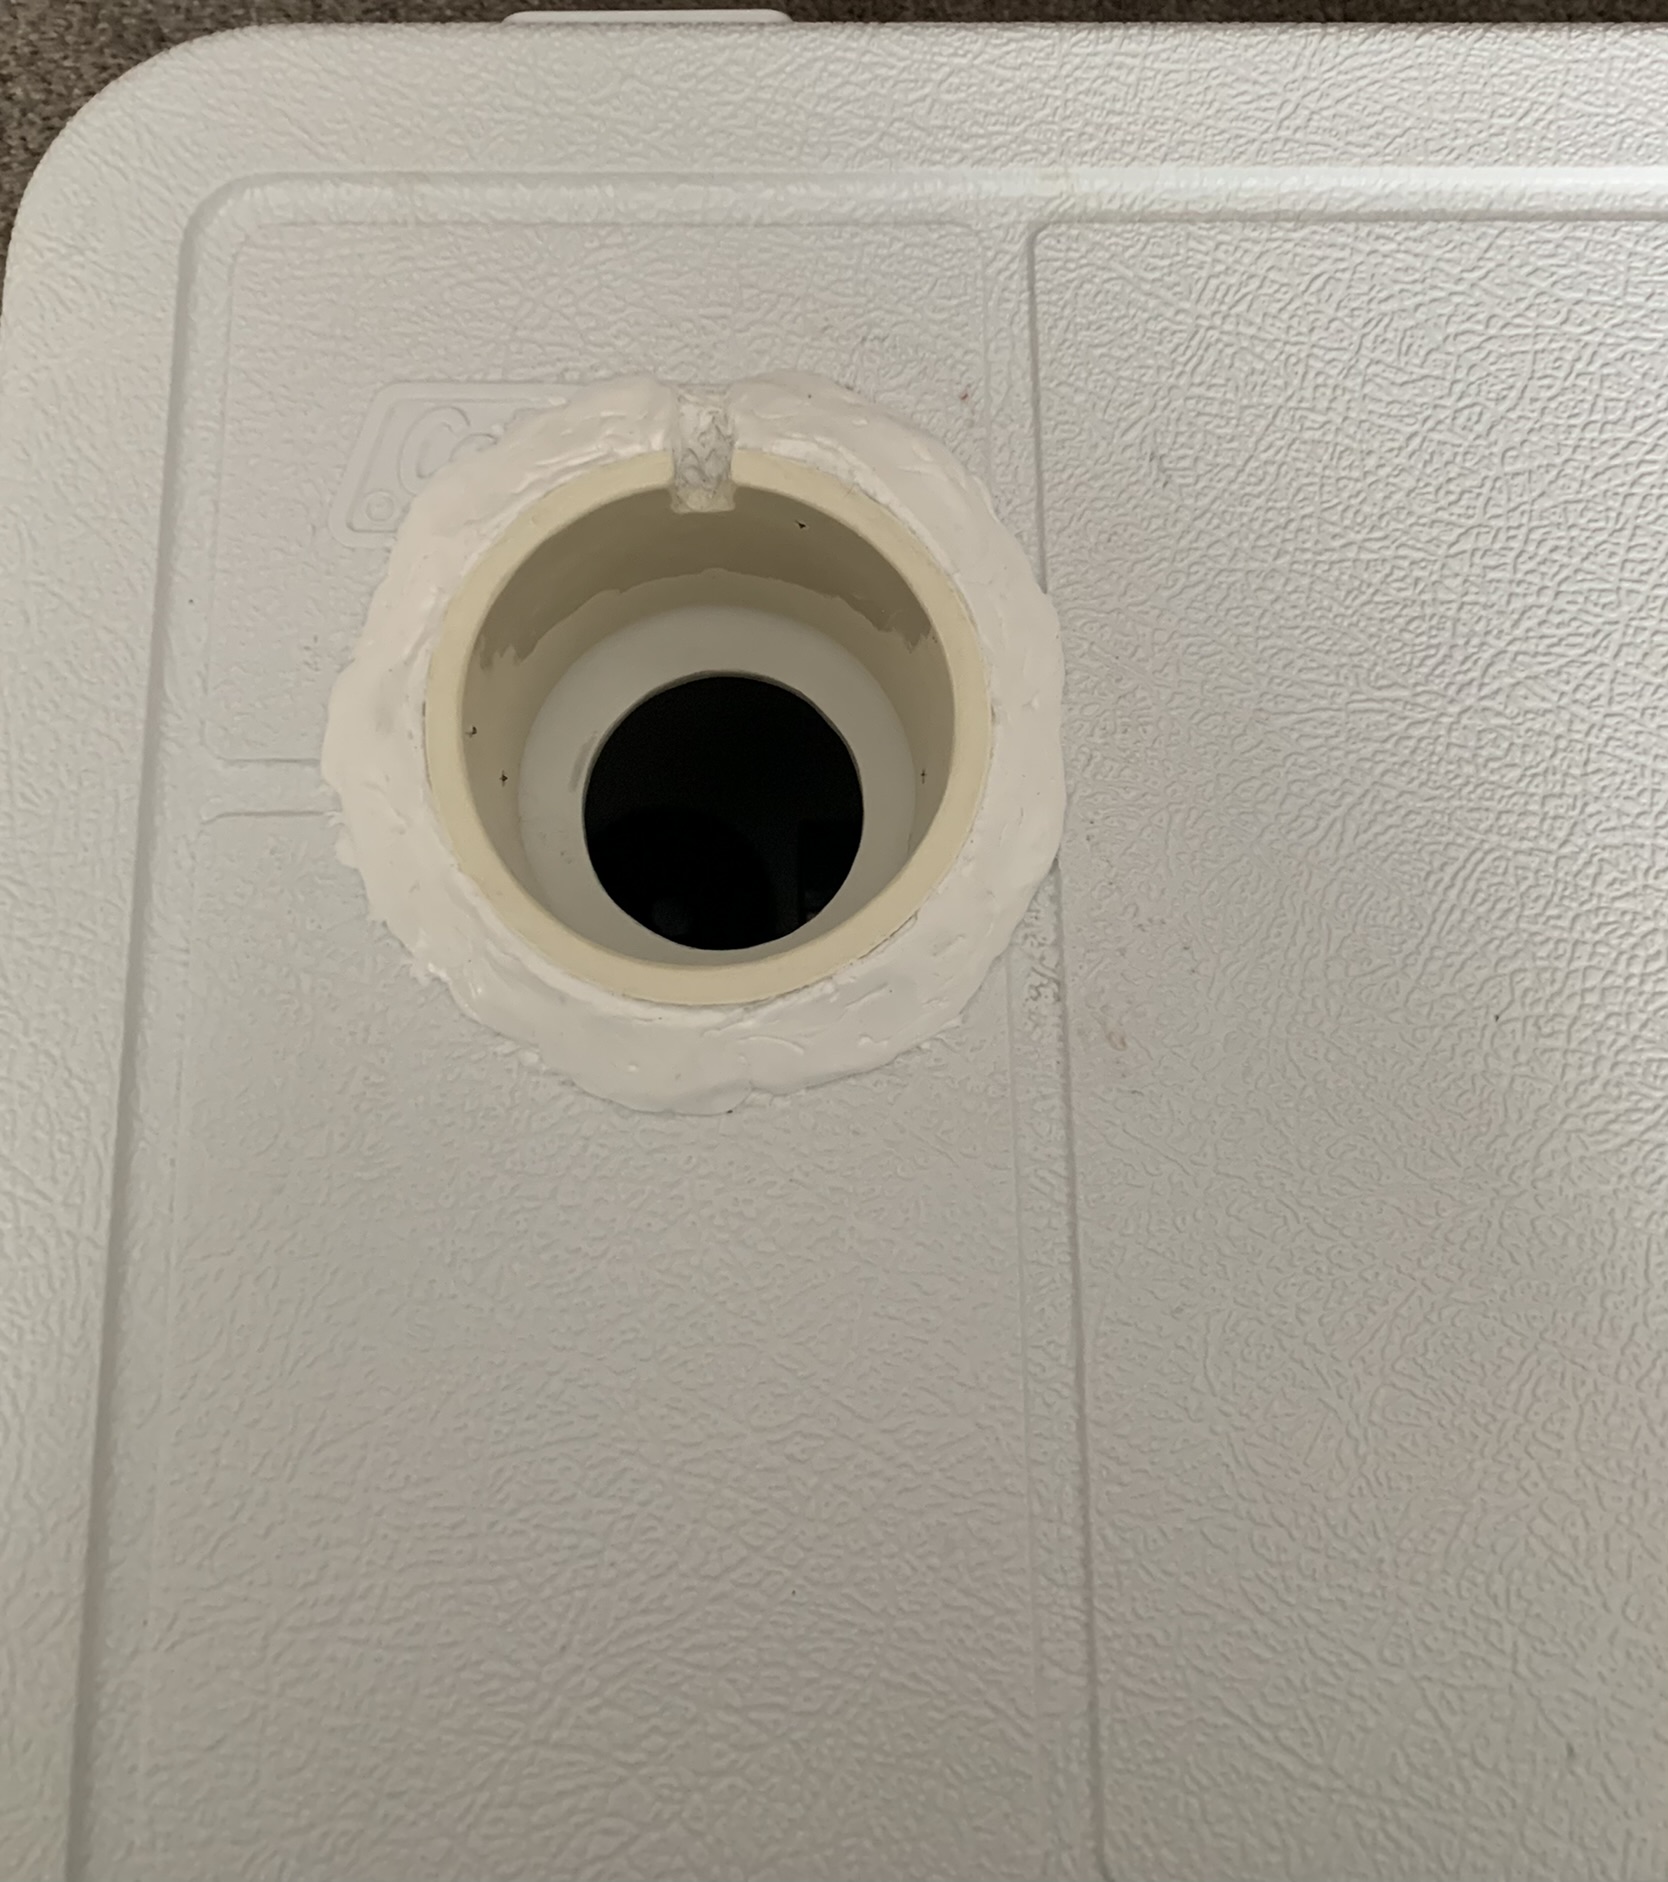
Then, I had to decide where I wanted to locate my Anova (its home) on the cooler/cooker lid… I went for that upper left location. This allows me to open & close the lid even with the Anova ‘in place’. A word of caution here… NEVER allow your Anova to be ‘ON’ and ‘removed’ (out) of the water. Apparently this is a sure fire way to burn up a Sous Vide cooker… so don’t open your lid with your Anova ‘On’.
Using a 3-5/8" hole saw (which I did have to buy @HD), I slowly & carefully cut the hole in the lid… it actually went/cut without any issues. Now, you are able to ‘feed’ the 3" pipe in from the side of the lid… be sure to bottom out the cap to the underside of the lid… NO Gap. From here, I had to decide just how much of the 3" pipe I actually was going to need ‘above’ the top side of the lid. I marked the pipe ‘flush’ to the lid and decided on I think… 1" higher. Now I marked & cut the pipe to length.
From here, I did not want my ‘creation’ to fall back into the cooler, so, with it fitted tight to the underside, I marked three spots on the pipe… @ ‘12’, ‘4’, and ‘8’. Then again using some small metal screws, 1/2" again, I screwed them in deep enough to hold but out enough to rest on top of the lid… now, the PVC ‘holder’ can’t be pulled up or pushed down… it’s secure!
Almost forgot… Pilot Holes are required to screw into the PVC
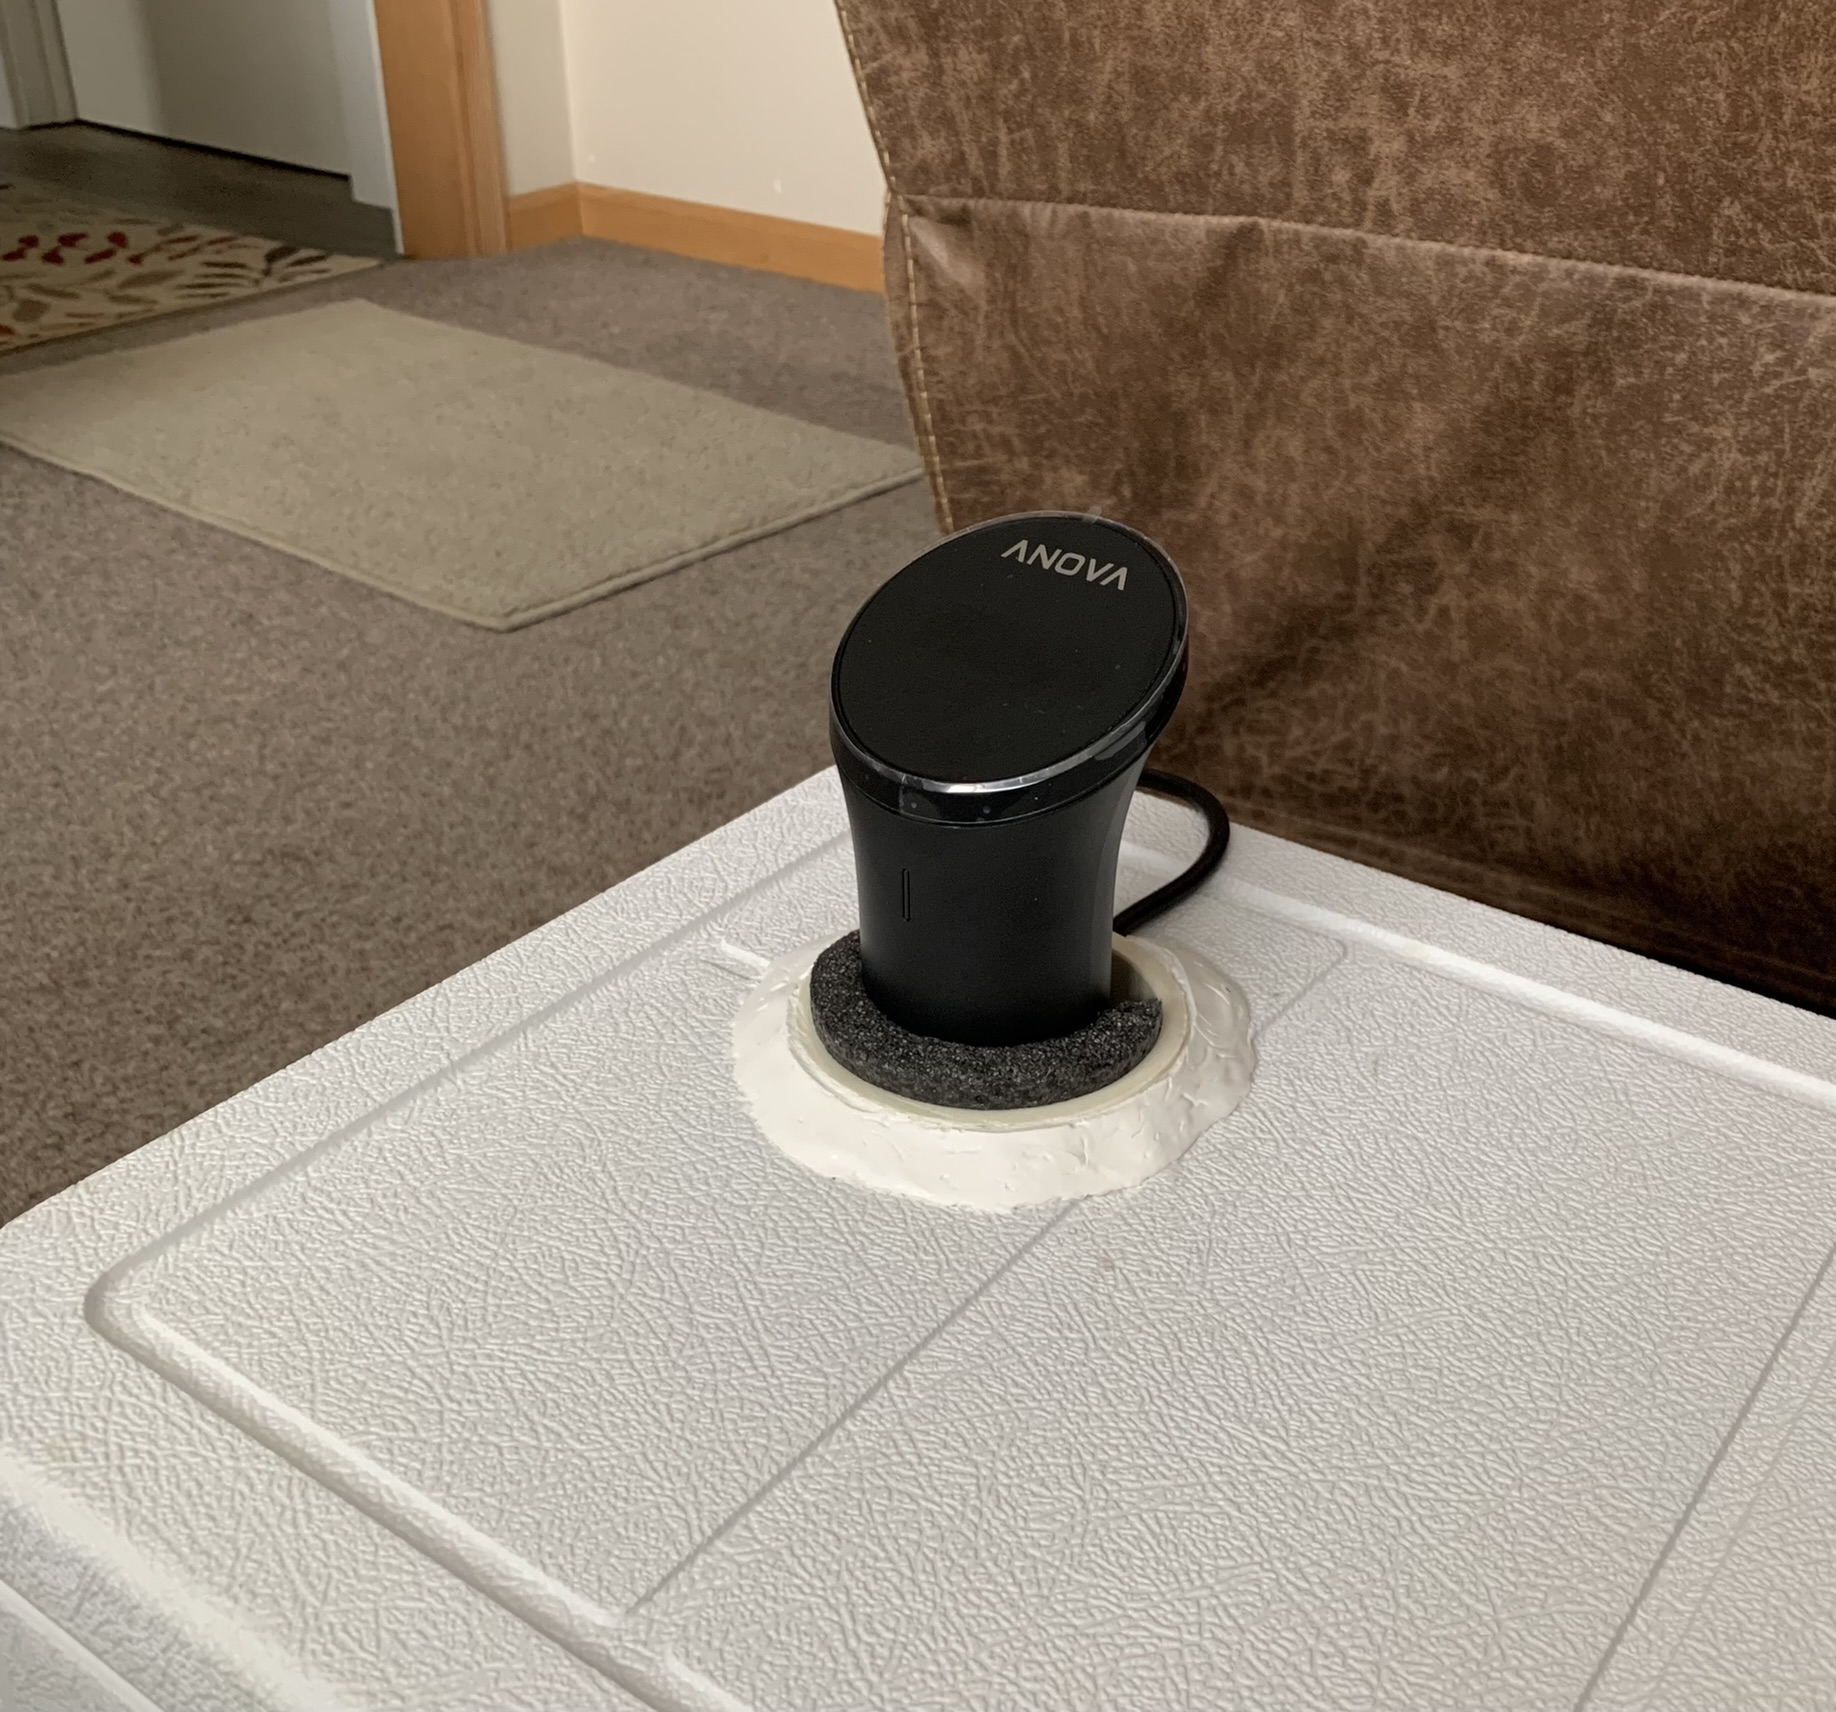
Now, you can see in the pic, I have a ‘slot’ cut in the back of the PVC pipe sticking out above the lid. This allows the Anova power cord to slide down to allow the Anova to be as low (down) as possible in the cooler/cooker. I wanted to make SURE that the Anova was always IN water and that it hung plenty ‘deep’… and it does!
From here, I used epoxy to seal/secure everything… top & bottom. Then I used silicon to ‘pretty’ things up.
You know that ‘black’ pipe insulation they sell for going around copper pipe (water heaters)… I had a piece of that laying around… 2". I cut a 1" piece off and it is a perfect fit/way to secure the Anova when in place… NO shake, rattle, or roll!
Done. Hope all that makes sense. I hope you have the pics you need. I tried ‘foaming’ the inside of the lid (spray can) for added insulation value as per a You Tube video. I found this to be a total waste of effort and NOT worth it… don’t do it. So yes, I had some additional holes to ‘seal’… wish I could do that over (or NOT OVER!)
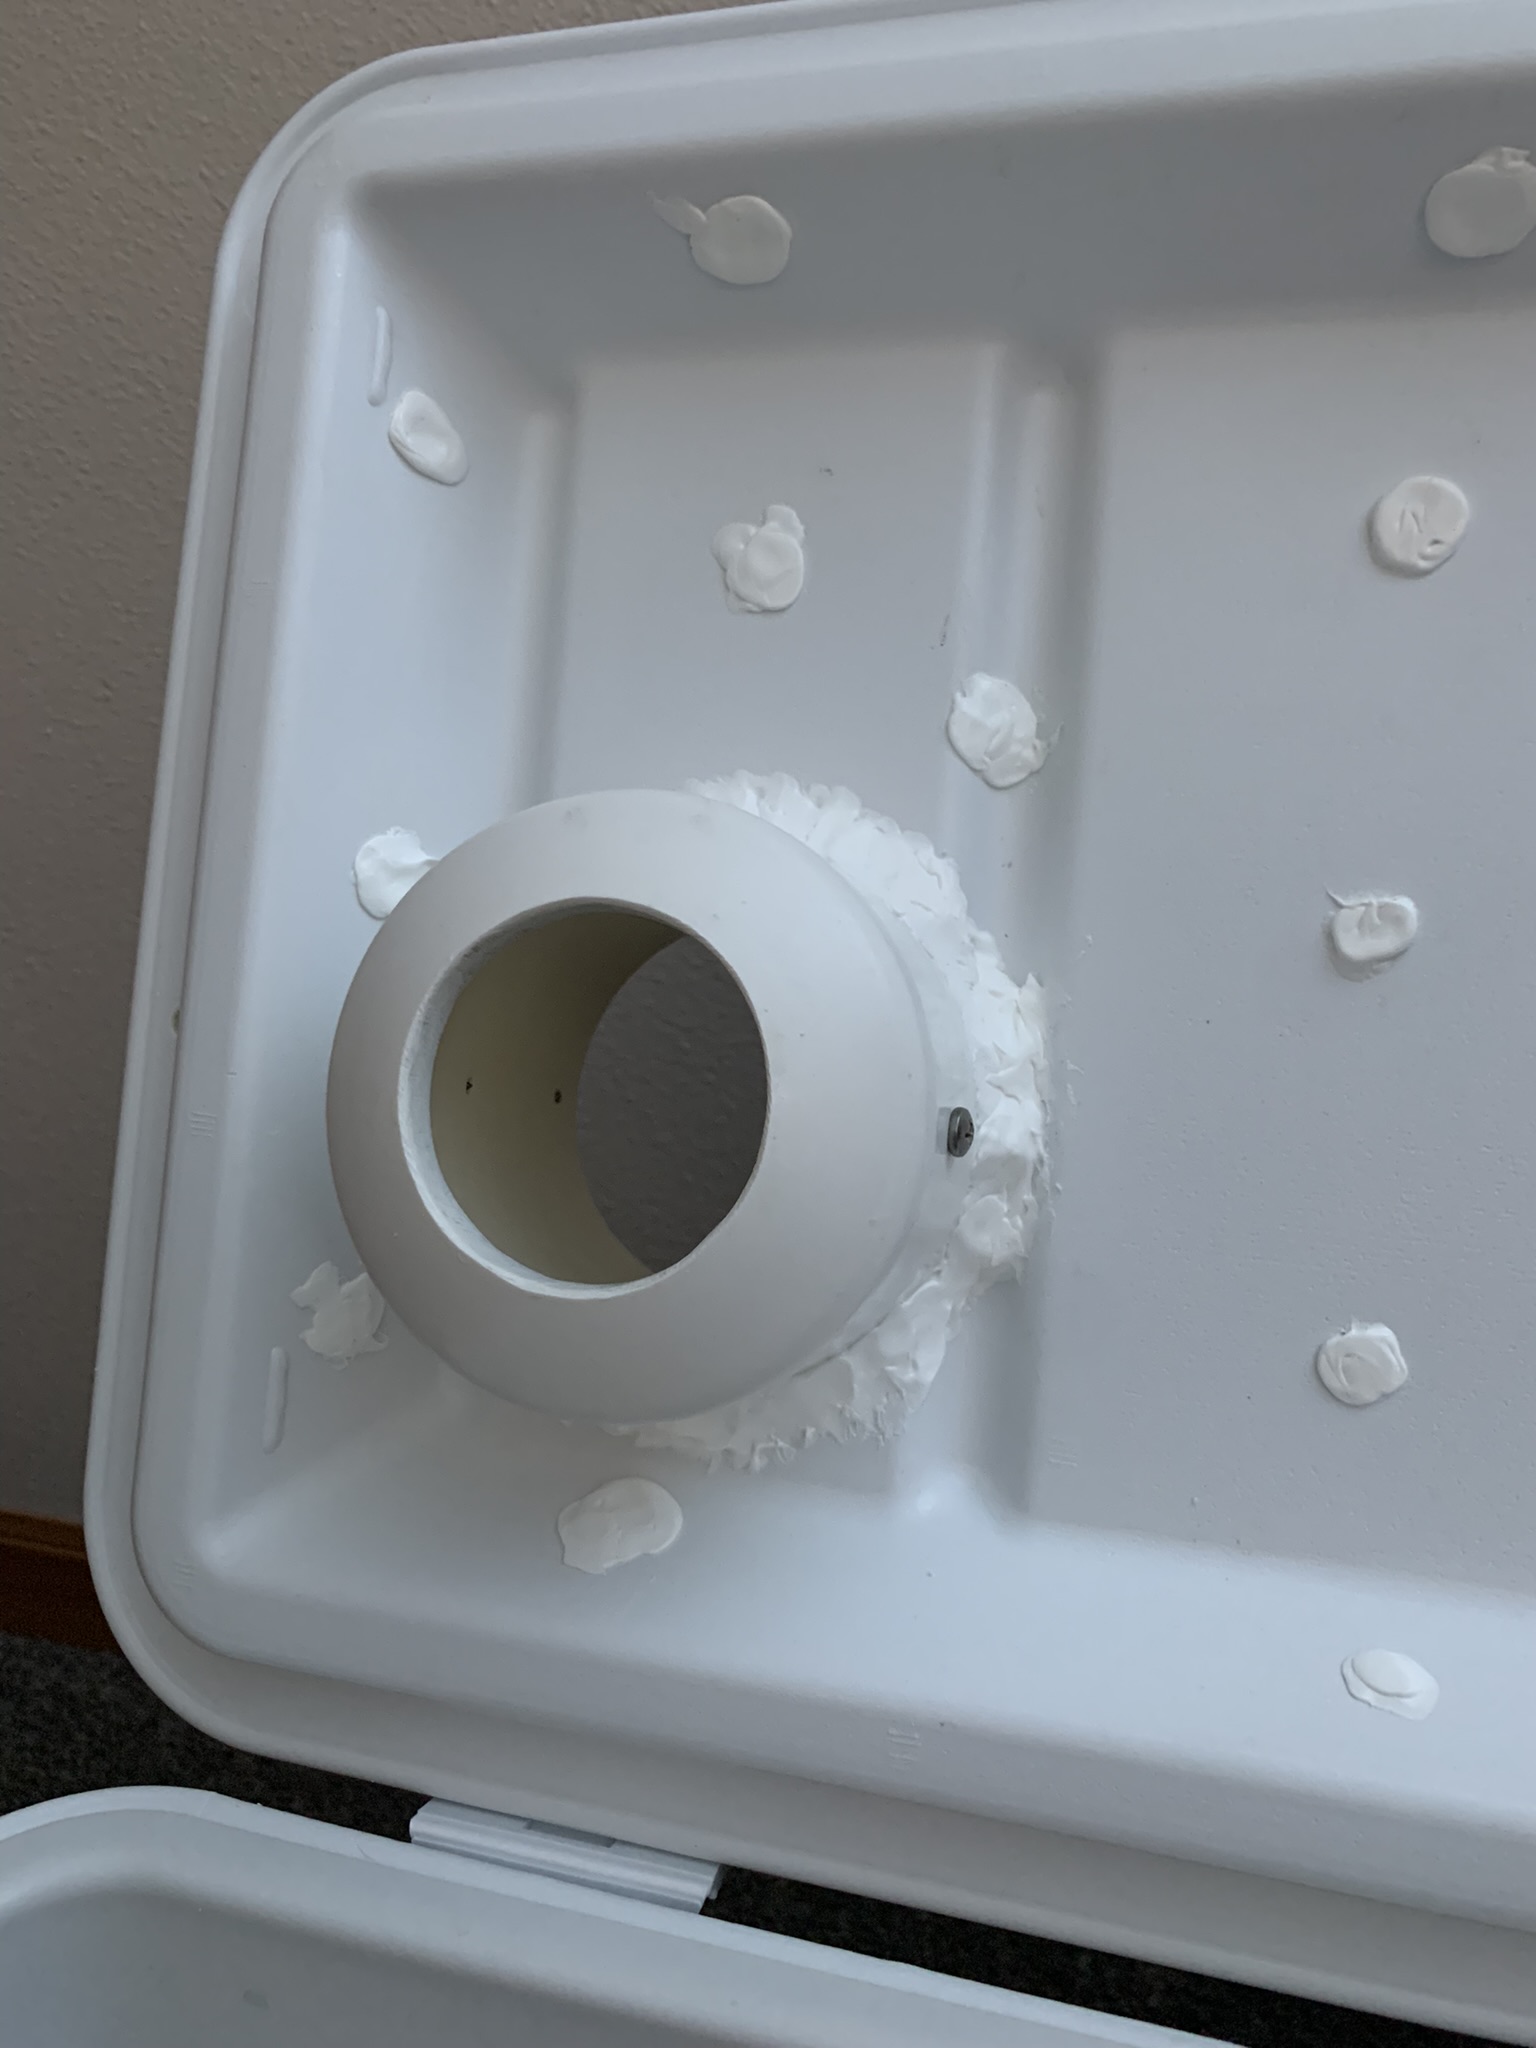 /Users/Ron/Pictures/Ron’s Photos Library.photoslibrary/resources/derivatives/0/0A6A59D0-2A39-4CF6-ACD8-423555CDAB45_1_102_o.jpeg
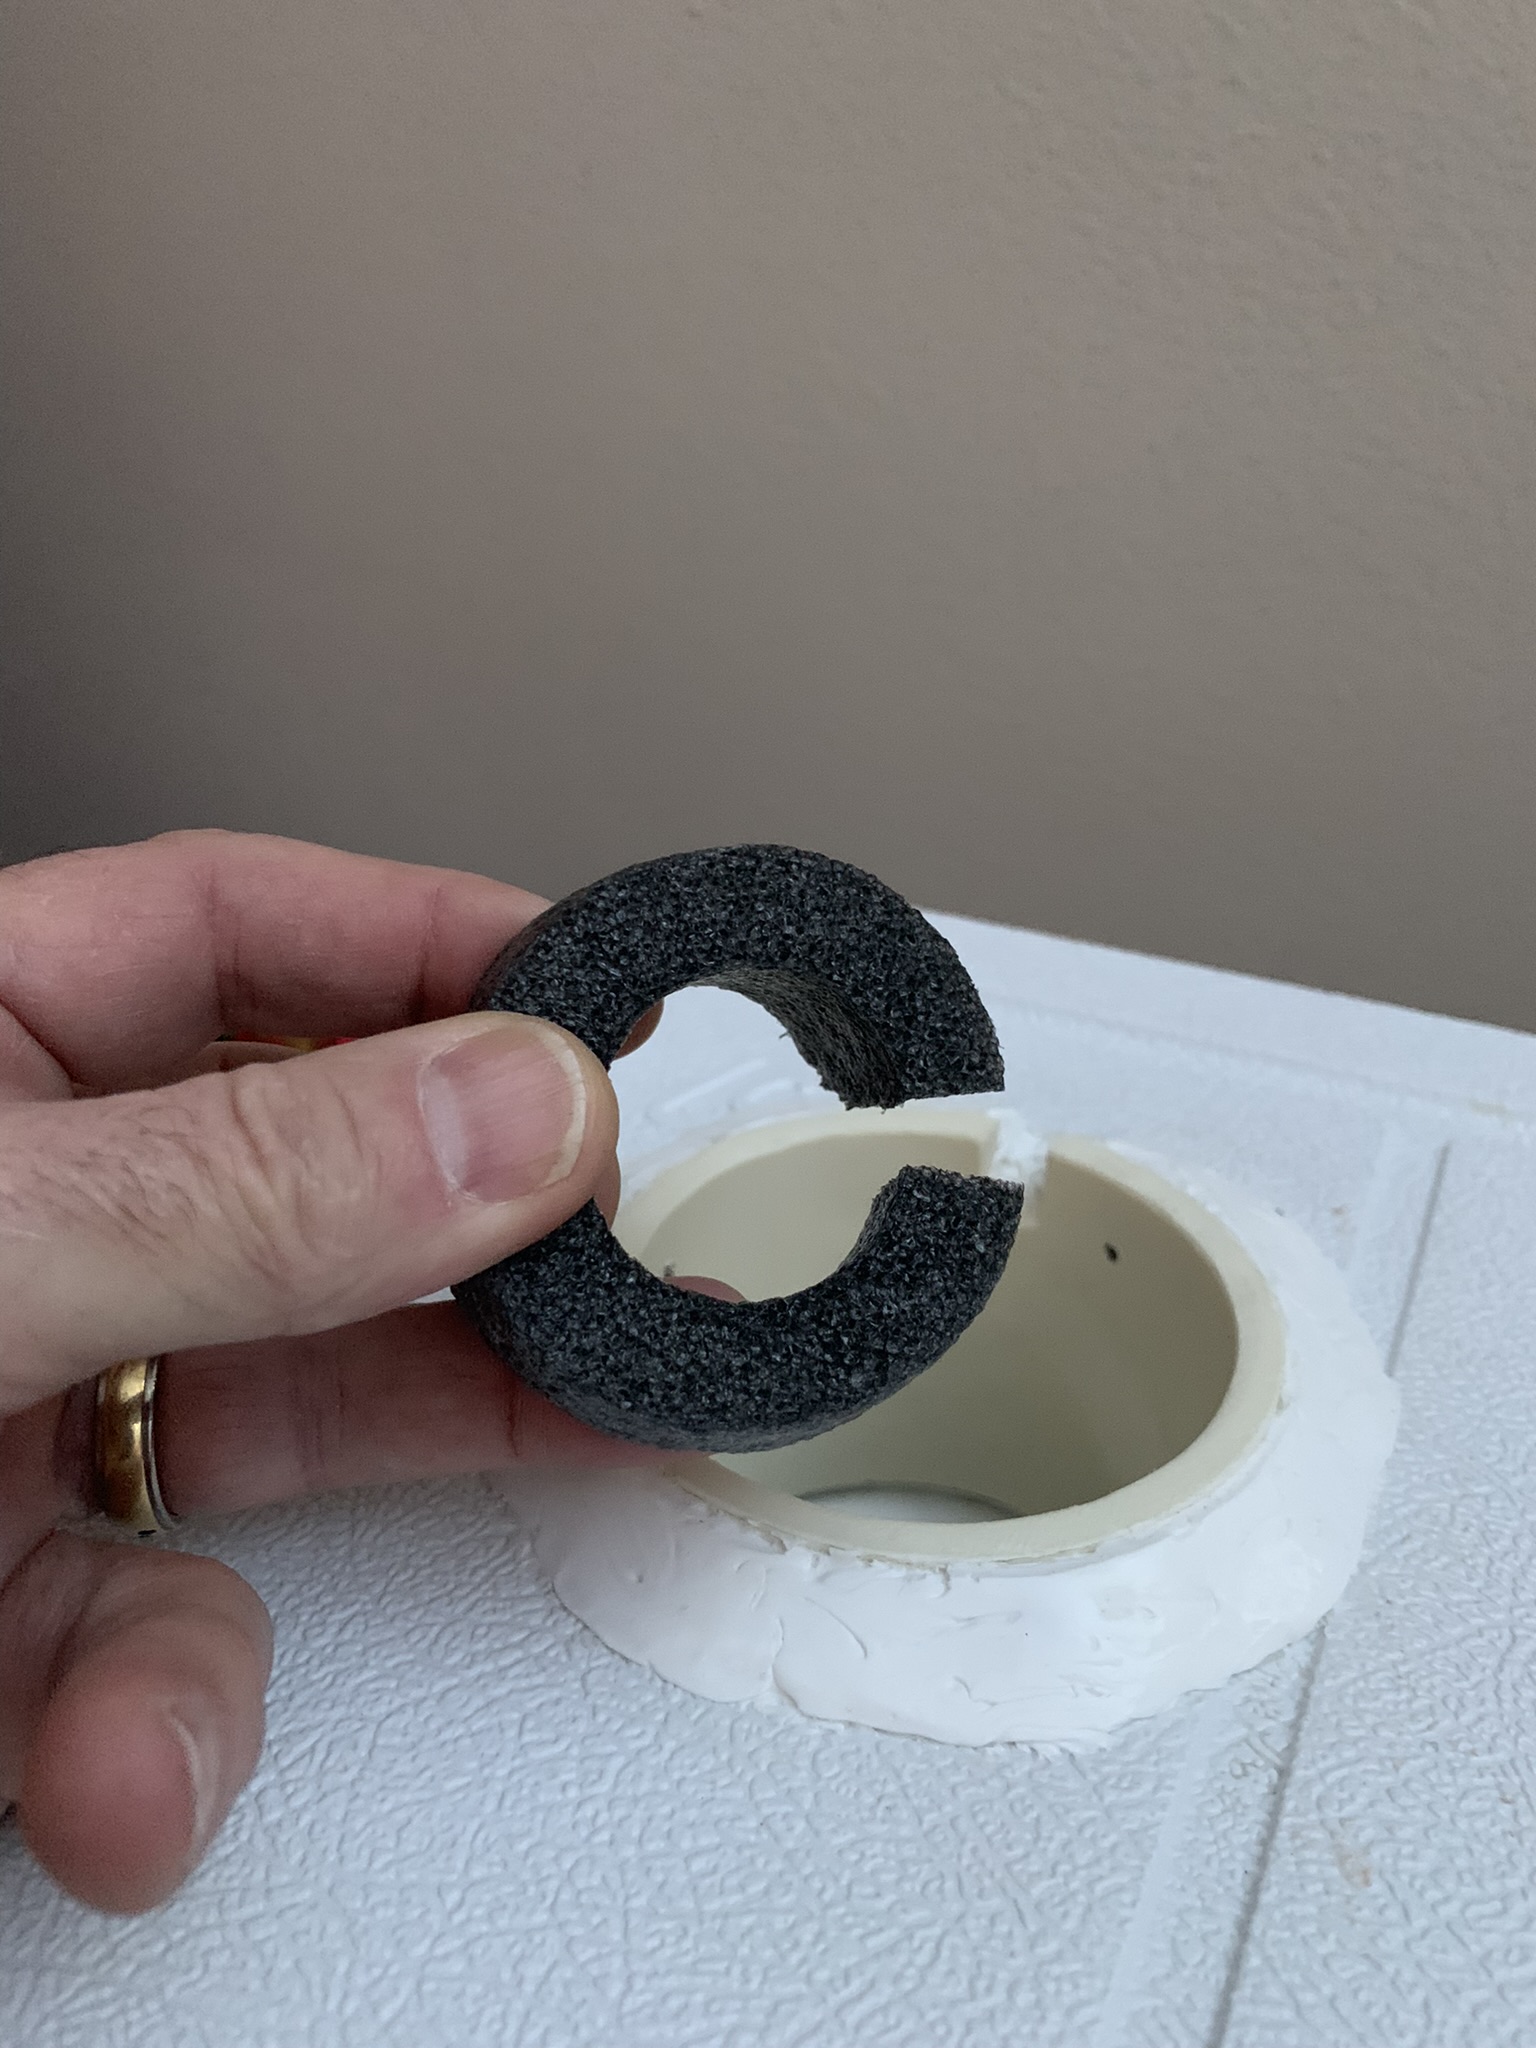 /Users/Ron/Pictures/Ron’s Photos Library.photoslibrary/resources/derivatives/A/A4CCBBA2-4185-4128-B29E-CA7D10D117A7_1_102_o.jpeg
 -
Retired157 are you happy overall with the smoker itself? There is a Smoking Tex 1400 on the local buy sell trade site here with little use for a good price. Thinking about pulling the trigger on it.
Actually, yes! I really like my little 1400. I am VERY impressed with how well it is built. Right now these guys for $649… I dang near sold mine last year at the wife’s Garage Sale… glad I sometimes don’t listen!
-
Hey no problem. First, I went with the Anova - 1000w - Sous Vide… so all my ‘measurements’ are specific for it. I bought cooker/cooler from Home Depot… 48quart Coleman. I also bought my Schedule 40 PVC from HD which I used to make/modify my cooler’s lid to hold the Anova. So, here goes…
First, I used 3" PVC for this modification. I bought one (2ft) section of 3"… they sell 2ft sections so you don’t have to buy a full length. Then, the only other thing I needed was a 3" cap… easy enough.
Next, thing I needed to do was ‘mark’ dead center (bottom) of my 3" cap. Then, using a 2-3/8" hole saw, I drilled out the cap… this hole now allows my Anova to slide in… nice & secure. After drilling this hole, I cleaned it up nicely with a rattail file.
With the hole done, I glued my 2ft length of 3" pipe in… all the way - bottom it out. You will note in the pic that in addition to gluing these parts together, I also used two sheet metal screws (small @1/2" - 180degrees out from each other) to ensure my two ‘pieces’ never come apart.
Then, I had to decide where I wanted to locate my Anova (its home) on the cooler/cooker lid… I went for that upper left location. This allows me to open & close the lid even with the Anova ‘in place’. A word of caution here… NEVER allow your Anova to be ‘ON’ and ‘removed’ (out) of the water. Apparently this is a sure fire way to burn up a Sous Vide cooker… so don’t open your lid with your Anova ‘On’.
Using a 3-5/8" hole saw (which I did have to buy @HD), I slowly & carefully cut the hole in the lid… it actually went/cut without any issues. Now, you are able to ‘feed’ the 3" pipe in from the side of the lid… be sure to bottom out the cap to the underside of the lid… NO Gap. From here, I had to decide just how much of the 3" pipe I actually was going to need ‘above’ the top side of the lid. I marked the pipe ‘flush’ to the lid and decided on I think… 1" higher. Now I marked & cut the pipe to length.
From here, I did not want my ‘creation’ to fall back into the cooler, so, with it fitted tight to the underside, I marked three spots on the pipe… @ ‘12’, ‘4’, and ‘8’. Then again using some small metal screws, 1/2" again, I screwed them in deep enough to hold but out enough to rest on top of the lid… now, the PVC ‘holder’ can’t be pulled up or pushed down… it’s secure!
Almost forgot… Pilot Holes are required to screw into the PVC
Now, you can see in the pic, I have a ‘slot’ cut in the back of the PVC pipe sticking out above the lid. This allows the Anova power cord to slide down to allow the Anova to be as low (down) as possible in the cooler/cooker. I wanted to make SURE that the Anova was always IN water and that it hung plenty ‘deep’… and it does!
From here, I used epoxy to seal/secure everything… top & bottom. Then I used silicon to ‘pretty’ things up.
You know that ‘black’ pipe insulation they sell for going around copper pipe (water heaters)… I had a piece of that laying around… 2". I cut a 1" piece off and it is a perfect fit/way to secure the Anova when in place… NO shake, rattle, or roll!
Done. Hope all that makes sense. I hope you have the pics you need. I tried ‘foaming’ the inside of the lid (spray can) for added insulation value as per a You Tube video. I found this to be a total waste of effort and NOT worth it… don’t do it. So yes, I had some additional holes to ‘seal’… wish I could do that over (or NOT OVER!)
/Users/Ron/Pictures/Ron’s Photos Library.photoslibrary/resources/derivatives/0/0A6A59D0-2A39-4CF6-ACD8-423555CDAB45_1_102_o.jpeg /Users/Ron/Pictures/Ron’s Photos Library.photoslibrary/resources/derivatives/A/A4CCBBA2-4185-4128-B29E-CA7D10D117A7_1_102_o.jpegRetired157 good post. Thanks
-
Hey no problem. First, I went with the Anova - 1000w - Sous Vide… so all my ‘measurements’ are specific for it. I bought cooker/cooler from Home Depot… 48quart Coleman. I also bought my Schedule 40 PVC from HD which I used to make/modify my cooler’s lid to hold the Anova. So, here goes…
First, I used 3" PVC for this modification. I bought one (2ft) section of 3"… they sell 2ft sections so you don’t have to buy a full length. Then, the only other thing I needed was a 3" cap… easy enough.
Next, thing I needed to do was ‘mark’ dead center (bottom) of my 3" cap. Then, using a 2-3/8" hole saw, I drilled out the cap… this hole now allows my Anova to slide in… nice & secure. After drilling this hole, I cleaned it up nicely with a rattail file.
With the hole done, I glued my 2ft length of 3" pipe in… all the way - bottom it out. You will note in the pic that in addition to gluing these parts together, I also used two sheet metal screws (small @1/2" - 180degrees out from each other) to ensure my two ‘pieces’ never come apart.
Then, I had to decide where I wanted to locate my Anova (its home) on the cooler/cooker lid… I went for that upper left location. This allows me to open & close the lid even with the Anova ‘in place’. A word of caution here… NEVER allow your Anova to be ‘ON’ and ‘removed’ (out) of the water. Apparently this is a sure fire way to burn up a Sous Vide cooker… so don’t open your lid with your Anova ‘On’.
Using a 3-5/8" hole saw (which I did have to buy @HD), I slowly & carefully cut the hole in the lid… it actually went/cut without any issues. Now, you are able to ‘feed’ the 3" pipe in from the side of the lid… be sure to bottom out the cap to the underside of the lid… NO Gap. From here, I had to decide just how much of the 3" pipe I actually was going to need ‘above’ the top side of the lid. I marked the pipe ‘flush’ to the lid and decided on I think… 1" higher. Now I marked & cut the pipe to length.
From here, I did not want my ‘creation’ to fall back into the cooler, so, with it fitted tight to the underside, I marked three spots on the pipe… @ ‘12’, ‘4’, and ‘8’. Then again using some small metal screws, 1/2" again, I screwed them in deep enough to hold but out enough to rest on top of the lid… now, the PVC ‘holder’ can’t be pulled up or pushed down… it’s secure!
Almost forgot… Pilot Holes are required to screw into the PVC
Now, you can see in the pic, I have a ‘slot’ cut in the back of the PVC pipe sticking out above the lid. This allows the Anova power cord to slide down to allow the Anova to be as low (down) as possible in the cooler/cooker. I wanted to make SURE that the Anova was always IN water and that it hung plenty ‘deep’… and it does!
From here, I used epoxy to seal/secure everything… top & bottom. Then I used silicon to ‘pretty’ things up.
You know that ‘black’ pipe insulation they sell for going around copper pipe (water heaters)… I had a piece of that laying around… 2". I cut a 1" piece off and it is a perfect fit/way to secure the Anova when in place… NO shake, rattle, or roll!
Done. Hope all that makes sense. I hope you have the pics you need. I tried ‘foaming’ the inside of the lid (spray can) for added insulation value as per a You Tube video. I found this to be a total waste of effort and NOT worth it… don’t do it. So yes, I had some additional holes to ‘seal’… wish I could do that over (or NOT OVER!)
/Users/Ron/Pictures/Ron’s Photos Library.photoslibrary/resources/derivatives/0/0A6A59D0-2A39-4CF6-ACD8-423555CDAB45_1_102_o.jpeg /Users/Ron/Pictures/Ron’s Photos Library.photoslibrary/resources/derivatives/A/A4CCBBA2-4185-4128-B29E-CA7D10D117A7_1_102_o.jpegAwesome!! Definitely going to try this. Thanks.
-
Yep… It won’t be much longer and I’ll be ready to try my hand at making some Summer Sausage. I’ve got one more ‘tweak’ I want to do with my smoker (don’t anyone tell my wife). I’m going to make a ‘portable’ fan to use in order to help with air flow at the intake damper. Ordered the fan yesterday…
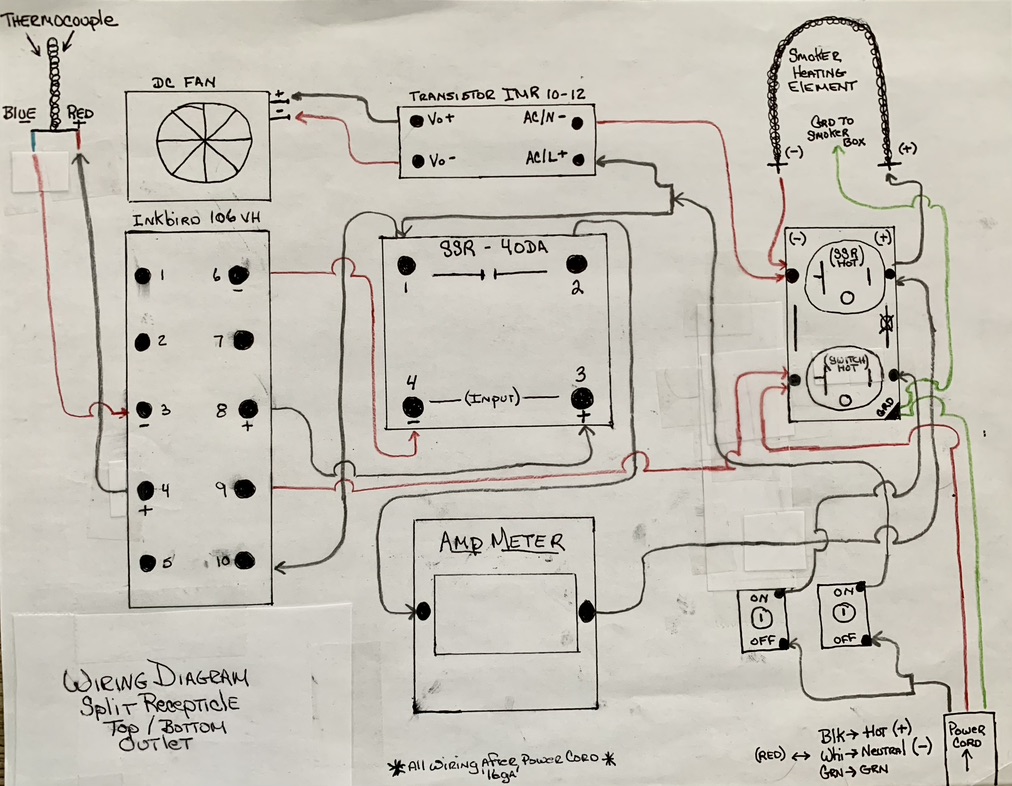
With respect to this PID project, I tell anyone who asks that it’s really not ‘rocket science’… if I can do it, ANYONE can! It was so easy after watching ‘George’ on his You Tube videos. The wiring diagram pic is so easy to follow. The pic of all the settings for the PID is straight forward and all you need. Anyone who has been ‘thinking’ about doing something like this but has been ‘wondering’… oh man, it was just so easy!
-
Retired157 What kind of adapter on your ice chest for Anova? I’ve used sous vide for the last couple years but haven’t modified a cooler yet.
I used PVC… a small piece of 3" pipe & a cap was all it took to make a really nice mod in my opinion. After that it was just getting back to my roots in being a ‘back yard mechanic’… I just replied to ‘stephenmterry’ with a completed ‘How I did it’… are you able to see that reply? I am not sure how this site actually ‘works’ but I hope you can access that reply.
-
I use charcoal, wood, and beer. That way I can tell my wife I can’t do anything for the day except drink beer and monitor temperatures or the food will be ruined. LOL
Yeah, I suspect that many of us have come up with some ‘creative’ solutions for our ‘better half’ … some work; some not so much

-
Retired157
/Users/Ron/Pictures/Ron’s Photos Library.photoslibrary/resources/derivatives/2/2AD9B916-BA8A-45B4-957A-2B55DB0C802E_1_102_a.jpeg
/Users/Ron/Pictures/Ron’s Photos Library.photoslibrary/resources/derivatives/B/B418E77D-E9CB-4D99-8FC1-33B7E5806CE5_1_102_a.jpeg
/Users/Ron/Pictures/Ron’s Photos Library.photoslibrary/resources/derivatives/3/3BCE4718-A23A-4F94-A8DD-513756A551E7_1_102_a.jpeg

/Users/Ron/Pictures/Ron’s Photos
/Users/Ron/Pictures/Ron’s Photos Library.photoslibrary/resources/derivatives/1/17947B7E-44BB-408F-B8E2-C3098D09DBC3_1_102_a.jpeg
/Users/Ron/Pictures/Ron’s Photos Library.photoslibrary/resources/derivatives/A/AC2012FB-5B22-4645-A7FA-C0986924733E_1_102_a.jpeg -
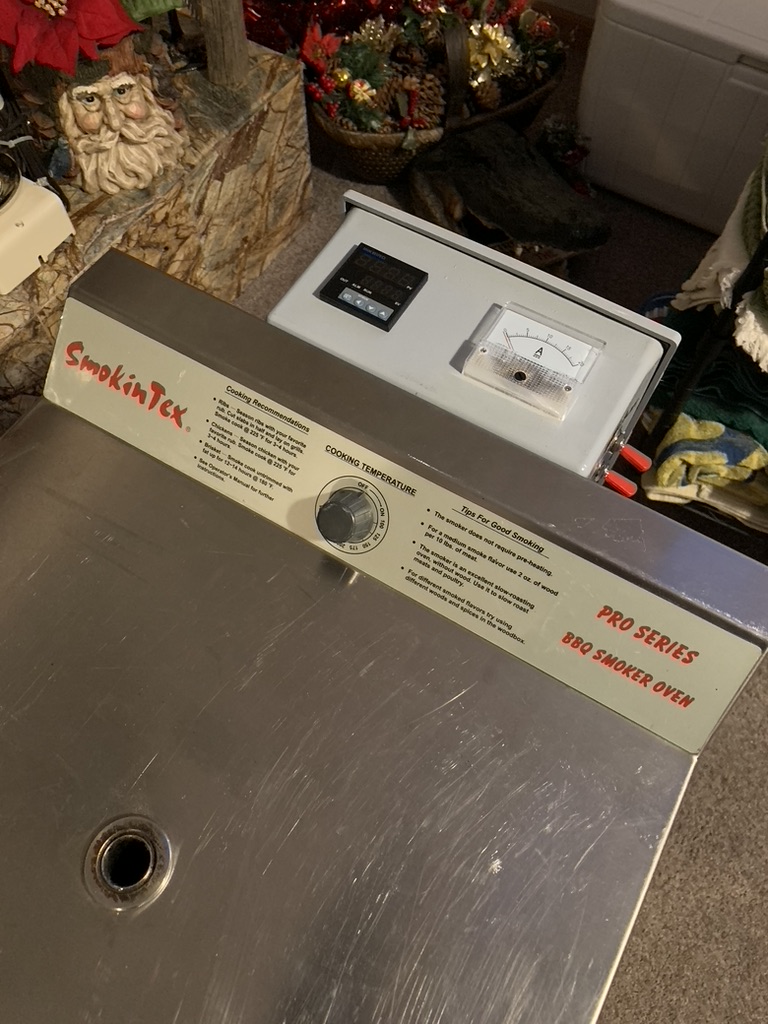
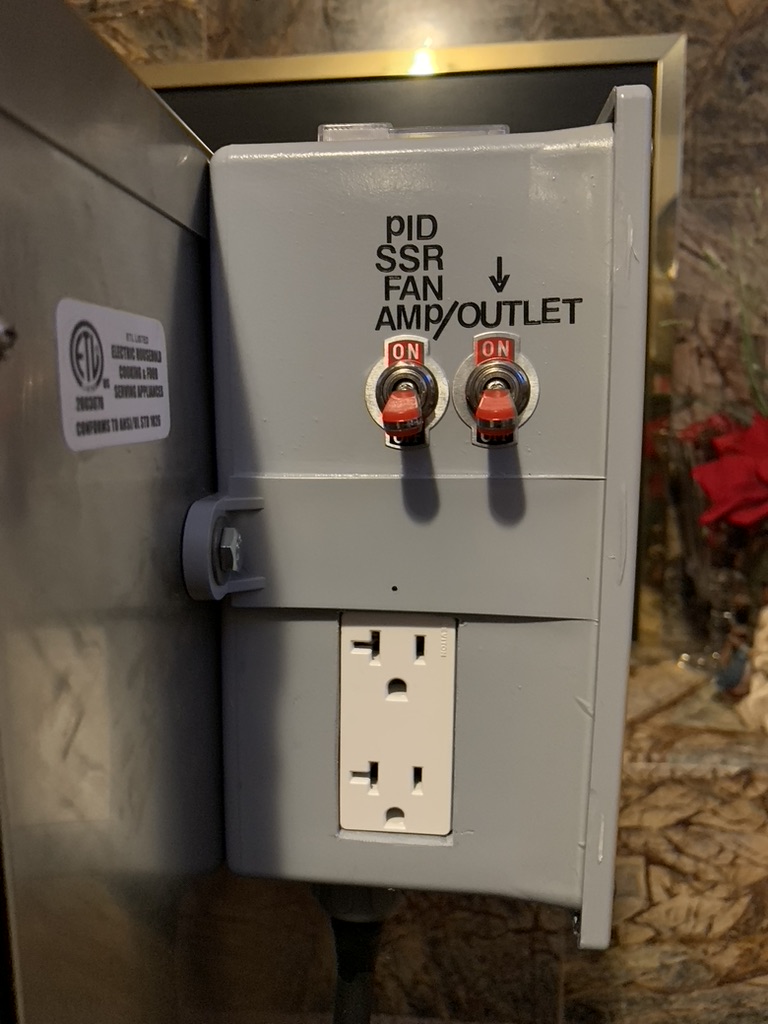
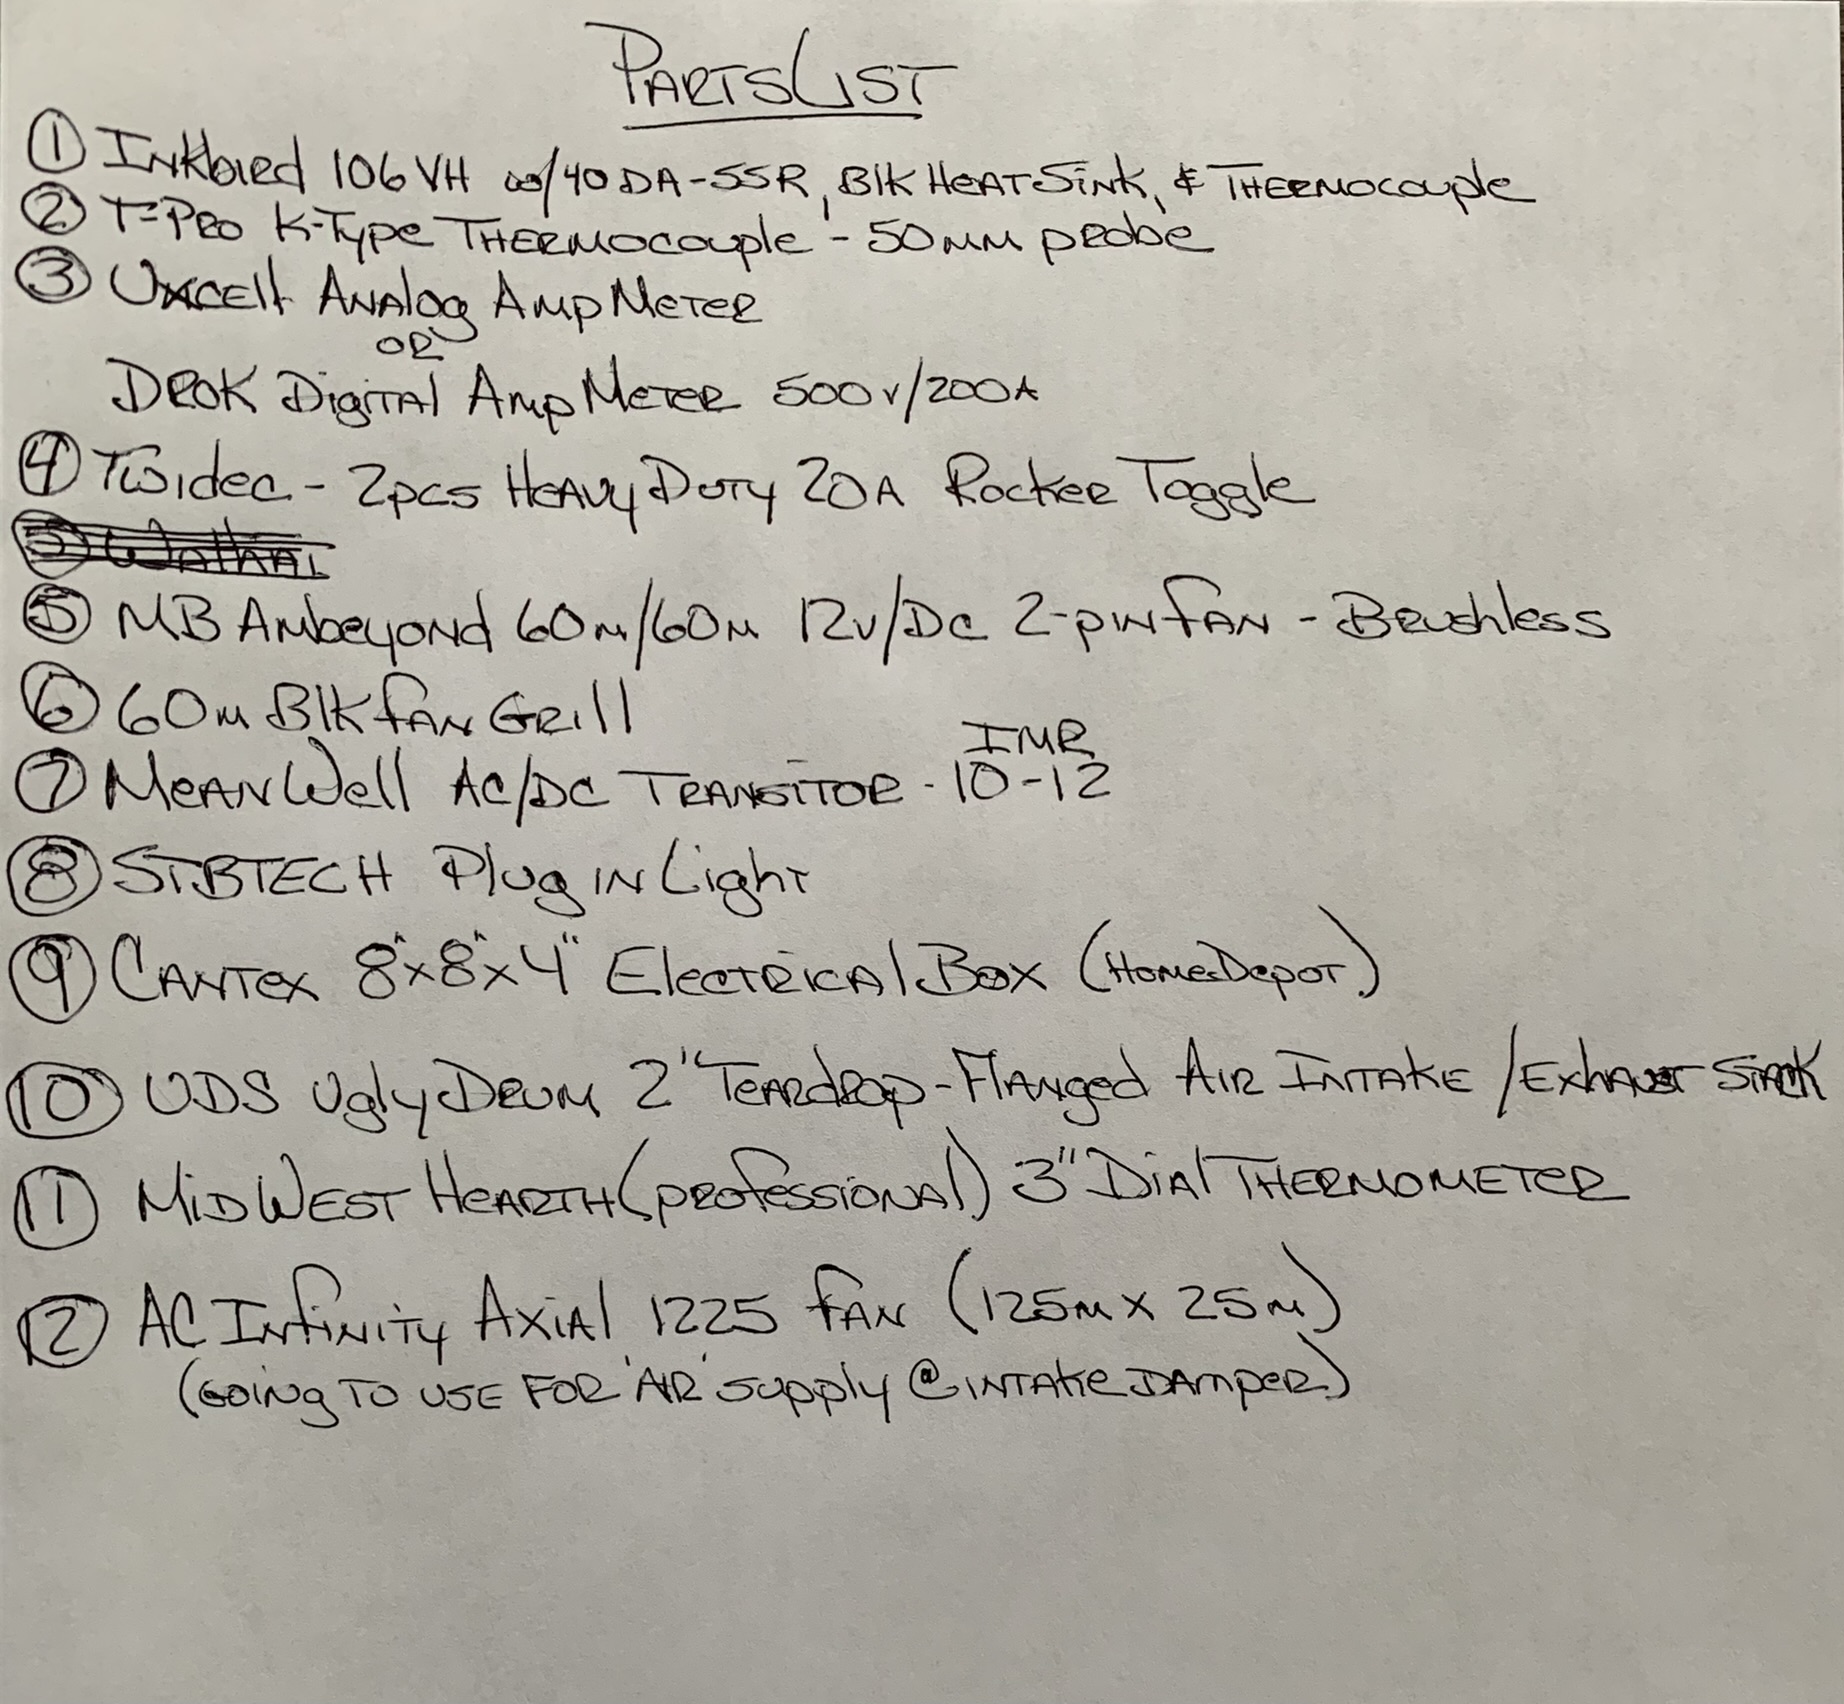
Hey everyone… thought I’d give you an ‘update’ as to where I am now, Jan. 14th, in my effort to begin making Summer Sausage. First, I gave my ‘upgraded’ smoker a bit of a test run two days ago in the garage. I put it through an ‘empty’ test using the times & temperatures of the cooking/smoking schedule I plan on using. Dang guys & gals, that PID thing really does work as advertised. That said, I did ‘learn’ a couple of things during this test. One, the ammeter (the annalog one as pictured with the ‘swing arm’) I originally had installed really did not work the way I had envisioned it would. I subsequently changed it out for the other option I included in my ‘parts list’… the DROK Digital 500v - 200a unit. Just a note here, the change was very easily done and required almost no effort on my part or any furthering of my electrical skills or knowledge… yes; even a caveman can do it. The DROK was EXACTLY what I was wanting and needing; it fulfilled what I was looking to accomplish. It’s ‘fun’ watching everything now ‘working’.
The next thing the test taught me was this; the damper (stack) that I installed on the door of my smoker is ABSOLUTELY a MUST. I learned very quickly that the PID ‘needed’ me to ‘move the air in & through’ the smoker so-as to allow the PID to maintain a ‘consistent’ internal box temperature. Once again, the ‘fix’ was soooo easy to incorporate into my procedure. All I did was grab a small fan out of my spare bedroom and locate it directly in front of the damper (about a foot away). Then, with a few adjustments of the damper’s ‘open & close’ lid, the PID using its internal ‘brain’ (don’t ask me), was able to in about 10 minutes get to and maintain any temperature I programmed in. Hey, I can see why those who have gone the PID route ‘swear’ by it!Yesterday I ordered all my spices & additives from Walton’s. So, where am I… dang near ready to take a swing at making SS! I did ‘discover’ something yesterday about ingredients and more specifically the ‘pork fat’ needed (I’m using deer/elk burger as my primary ‘meat’). I’ve read a lot of ‘posts’ about just ‘where’ to come up with pork fat. I spent some time yesterday driving around town checking with our local food chain stores and the two butcher shops here only to be disappointed. Bottomline, finding ‘pork fat’ is as close to impossible as I care to come! Not that I want to age myself, but as a kid, I remember my mom & grandma both using ‘Fat Back’ when cooking… I was on a mission now to ‘make it happen’. After a little research on-line, I came up with the solution! If you want REAL ‘Fat Back’, simply look up the site DeBragga out of New York. You can order the BEST (award winning) Fat Back directly from them. Yes, I ordered four packages (2lb ea) from them. They are easy to work with and lots of fun to talk to. Ask for Lydia… she’s a hoot and a full blown chef! Yes, there is a shipping cost involved… overnight FedEx @$49.95. To me… it’s the cost of getting the best. If I had another ‘smoker’; here in Great Falls, we could make one order and cut the shipping ‘in half’… something to think about.
Ok, you are now caught up. I’ll send more pics of the changes I made to my smoker when I actually ‘run’ my first 10lbs of SS. I’m getting there!
Thanks to everyone!
-
Hey everyone… thought I’d give you an ‘update’ as to where I am now, Jan. 14th, in my effort to begin making Summer Sausage. First, I gave my ‘upgraded’ smoker a bit of a test run two days ago in the garage. I put it through an ‘empty’ test using the times & temperatures of the cooking/smoking schedule I plan on using. Dang guys & gals, that PID thing really does work as advertised. That said, I did ‘learn’ a couple of things during this test. One, the ammeter (the annalog one as pictured with the ‘swing arm’) I originally had installed really did not work the way I had envisioned it would. I subsequently changed it out for the other option I included in my ‘parts list’… the DROK Digital 500v - 200a unit. Just a note here, the change was very easily done and required almost no effort on my part or any furthering of my electrical skills or knowledge… yes; even a caveman can do it. The DROK was EXACTLY what I was wanting and needing; it fulfilled what I was looking to accomplish. It’s ‘fun’ watching everything now ‘working’.
The next thing the test taught me was this; the damper (stack) that I installed on the door of my smoker is ABSOLUTELY a MUST. I learned very quickly that the PID ‘needed’ me to ‘move the air in & through’ the smoker so-as to allow the PID to maintain a ‘consistent’ internal box temperature. Once again, the ‘fix’ was soooo easy to incorporate into my procedure. All I did was grab a small fan out of my spare bedroom and locate it directly in front of the damper (about a foot away). Then, with a few adjustments of the damper’s ‘open & close’ lid, the PID using its internal ‘brain’ (don’t ask me), was able to in about 10 minutes get to and maintain any temperature I programmed in. Hey, I can see why those who have gone the PID route ‘swear’ by it!Yesterday I ordered all my spices & additives from Walton’s. So, where am I… dang near ready to take a swing at making SS! I did ‘discover’ something yesterday about ingredients and more specifically the ‘pork fat’ needed (I’m using deer/elk burger as my primary ‘meat’). I’ve read a lot of ‘posts’ about just ‘where’ to come up with pork fat. I spent some time yesterday driving around town checking with our local food chain stores and the two butcher shops here only to be disappointed. Bottomline, finding ‘pork fat’ is as close to impossible as I care to come! Not that I want to age myself, but as a kid, I remember my mom & grandma both using ‘Fat Back’ when cooking… I was on a mission now to ‘make it happen’. After a little research on-line, I came up with the solution! If you want REAL ‘Fat Back’, simply look up the site DeBragga out of New York. You can order the BEST (award winning) Fat Back directly from them. Yes, I ordered four packages (2lb ea) from them. They are easy to work with and lots of fun to talk to. Ask for Lydia… she’s a hoot and a full blown chef! Yes, there is a shipping cost involved… overnight FedEx @$49.95. To me… it’s the cost of getting the best. If I had another ‘smoker’; here in Great Falls, we could make one order and cut the shipping ‘in half’… something to think about.
Ok, you are now caught up. I’ll send more pics of the changes I made to my smoker when I actually ‘run’ my first 10lbs of SS. I’m getting there!
Thanks to everyone!
Retired157 Thanks for the update.
Can you elaborate on what you disliked about the original ammeter and what made the replacement unit an improvement?Also, with my smokers, I find the PID temperature control is very different when heating an empty smoker compared to a smoker full of product.
When I do test runs, I usually put a container of water or something else with some thermal mass to simulate a load of meat product.
Are you doing anything like this on your test runs?
Paul
-
Retired157 Thanks for the update.
Can you elaborate on what you disliked about the original ammeter and what made the replacement unit an improvement?Also, with my smokers, I find the PID temperature control is very different when heating an empty smoker compared to a smoker full of product.
When I do test runs, I usually put a container of water or something else with some thermal mass to simulate a load of meat product.
Are you doing anything like this on your test runs?
Yeah… the original ammeter with its ‘swing arm’ display wasn’t really ‘sensitive’ enough to ‘see’ what was going on. It was barely moving… not what I was wanting ‘to see’. The DROK, with its digital display to one position ‘right’ of the decimal point, gave me an easy ‘visual’ to see with respect to the amperage being used. Once again… is it required; maybe not. However, my goal was to be able to monitor this and with the DROK, I am now satisfied I fulfilled that ‘expectation’.
Hey, I just did a ‘dry’ run… nothing at all in the box. I think you were the one who told me early on that ‘controlling’ the internal temps of the smoker was actually easier with the ‘product’ inside; during an actual cooking process. So, I figure it I am happy (totally) with my PID upgrade during a dry run test, it can only get better from there.
-
Retired157 Thanks for the updates. I’m enjoying hearing about your journey. Let us know about the quality of that fat back.
-
Lydia says… “It’s flavor is to die for”
-
Lydia says… “It’s flavor is to die for”
Ok, here’s a pic to show you how my DROK ammeter mod came out.
/Users/Ron/Pictures/Ron’s Photos Library.photoslibrary/resources/renders/E/EF5E40CD-1739-4CA1-AF10-5BD9016A3ACF_1_201_a.heic
-
Well that didn’t work! Not sure why sometimes I can get a pic to upload and sometimes I get shut down…








Hello! It looks like you're interested in this conversation, but you don't have an account yet.
Getting fed up of having to scroll through the same posts each visit? When you register for an account, you'll always come back to exactly where you were before, and choose to be notified of new replies (either via email, or push notification). You'll also be able to save bookmarks and upvote posts to show your appreciation to other community members.
With your input, this post could be even better 💗
Register LoginSponsored By:

